
Please read this section carefully and completely before you start building your first MattzoController.
The electrical wiring and the firmware of the different MattzoController types are different, but all controllers also have strong similarities.
MattzoController in general
This section applies to all types of MattzoControllers.
In this section, some common features of all kinds of the MattzoController are described. The different types of MattzoControllers are described in greater detail in the subsequent sections.
General considerations
First you need to build the controller, download the firmware, do some network and wiring configuration in the code, and then upload the firmware to the controller.
To complete these tasks successfully, it is helpful if you have played around with microcontrollers before. It is even more helpful if you have basic understanding of computer networks and computer programming.
Nevertheless, we know of many people who successfully managed to build and set-up MattzoControllers with very little specific knowledge about those things, and brought their LEGO train layout to a whole new level.
The Mattzobricks community is growing every day, and we are proud about each new layout that was automated with the Mattzobricks Train Automation System.
Building the different controller types
Instructions how to build the different controllers can be found in the controller-specific sections.
If you have a 3d printer, you may be interested in the stl files to print out some nice cases for the controllers.
Uploading the firmware
Previous versions of the MattzoController firmware needed to be compiled and uploaded with the Arduino IDE.
In 2022, we have migrated all of the firmware packages to a new platform (VSCode with the platformIO plug-in). The source code is also now publically available in Mattzobricks’ MattzoController github repository.
Information about getting and uploading the firmware can be found on the firmware page.
WiFi setup
The MattzoController tries to connect to WIFI on start-up. The SSID and WIFI passphrase must be set in the network configuration file before you upload the firmware in order to enable the controller to establish the connection.
If you have installed the optional status LED, the LED flashes during the WiFi connection process (0.1 seconds on, 0.9 seconds off). After a successful connect, the LED turns blinking (0.5 seconds on, 0.5 seconds off) to indicate it tries to connect to the MQTT broker.
MQTT
Setting up MQTT
After establishing a WIFI connection, the controler connects to the MQTT broker.
Download and install a MQTT broker and start it somewhere in your local network, e.g. on the computer on which Rocrail is running. The most common MQTT broker is the free “mosquitto” software, which can be downloaded from https://mosquitto.org.
The IP address of the MQTT broker must also be set in your network configuration file.
Mosquitto needs no special configuration in version 1.x. Just start it by running mosquitto.exe.
Please be aware that your computer may have multiple network adapters, e.g. one for Ethernet (LAN) and another one for WiFi. It is important that mosquitto is listening on the WiFi network adapter. If you want to keep things simple, deactivate all network adapters that you do not need or – even simpler – pull out the network cable before starting mosquitto.
Important: From mosquitto version 2.0 and above, mosquitto needs a configuration file in order to allow connections from clients that do run on the same machine as mosquitto itself – like the MattzoControllers. The configuration file should be named mosquitto.conf and should be in the mosquitto installation directory. The file needs to contain the following lines:
allow_anonymous true
listener 1883
You can now start mosquitto with the following command:
mosquitto -c mosquitto.conf
If you use Microsoft Windows 10, another option is to use the mosquitto service, which is automatically installed on your machine if you have installed mosquitto 2.0 with the mosquitto installation program. Navigate to the Windows Services, start the service and set the start-up type to “automatic”. Remember to set-up the mosquitto.conf file exactly as described above!
If you have installed the optional status LED, the LED blinks (0.5 seconds on, 0.5 seconds off) to indicate it tries to connect to the MQTT broker. After a successful connection, the LED is turned off.
Fetching the MattzoControllerID via MQTT
When a MattzoController starts for the first time, it automatically creates a MattzoControllerID.
The MattzoControllerID is required for the MLC, as it must be used as the Rocrail base address of all components that you connect to the controller.
After the controller has connected to the MQTT broker, the MattzoControllerID can be identified by monitoring the MQTT messages on the MQTT broker. To inspect the MQTT message, you must run the MQTT broker in a mode in which it logs out the MQTT messages. This is often called the “verbose” mode. If mosquitto is used as MQTT broker, the verbose mode can be started in MS Windows. Stop the service, open a command line window, navigate to the mosquitto installation directory and type:
mosquitto -v
If you use mosquitto 2.0+, the command would be:
mosquitto -c mosquitto.conf -v
Important: The verbose mode is good for detecting the MattzoControllerID, and for testing and debugging. Do not use verbose mode when you operate large and complex layouts with a large number of switches, sensors, lights, trains and MattzoControllers, because the option may significantly slow down the communication between the components. This may lead to overshooting of trains after they pass sensors or other undesired behaviour of the your rolling and fixed stock.
Emergency Brake
MattzoControllers send last will messages to the MQTT broker upon disconnection, if they are critical to your railway operation. A controller must be considered “critical” if it controls one or more of the following components:
- switches,
- sensors,
- bascule bridges,
- turn tables,
- trains.
The following components are usually not critically, as they simply beautify your layout, but do not lead to consecutive problems in case of their failure:
- signals,
- level crossings,
- speed controllers.
Last will messages trigger the emergency brake for all MattzoTrainControllers, i.e. all trains stop if a critical MattzoController disconnects from the MQTT broker. This helps to prevent larger crashes on the layout.
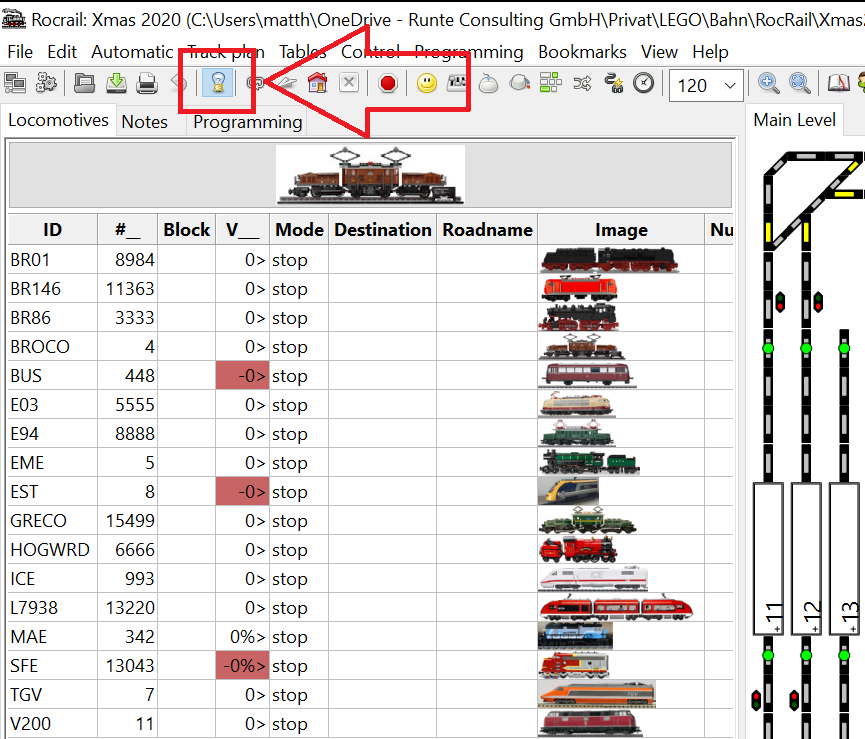
You can also trigger the emergency brake directly from Rocrail: Either press the “Power off” button (the light bulb), or the “Emergency Brake” (the red dot). This way, a ghost train can trigger an emergency brake situation, which is quite handy to prevent larger crashes. To set this up, you need to enable the feature “Power off at ghost train” in the Rocrail settings.
Shutting down Rocrail will also trigger the emergency brake.
An emergency brake situation can be noted by two things:
- No trains are moving any more
- All train lights are blinking.
The emergency brake situation remains until you have reset it. To reset, you need to virtually switch the “power” in Rocrail off and on again:
The Serial Monitor
On first boot, the controller generates a random number called “MattzoControllerID”. This id is an integer value between 1 and 65000. The MattzoControllerID is stored in the long-term memory of the micro controller and reloaded on subsequent boots.
The controller prints the MattzoControllerId to serial on boot. You can inspect the information when you connect the controller via USB to your PC, start the serial monitor of the Arduino IDE (Ctrl + Shift + M) and reset the controller.
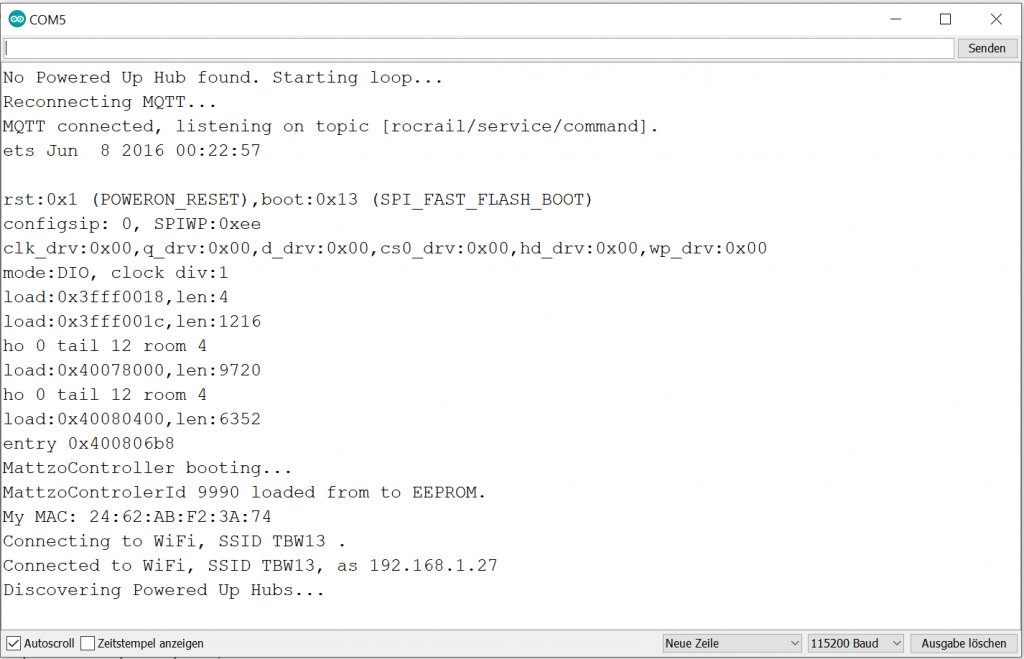
Tip: it’s also a good idea to have the controller connected to the serial monitor when trying to solve problems. Even better it to use the built-in syslog capability of the MattzoControllers. To use this feature, you need to enable and set it up in MattzoController_Network_Configuration.h.
If you use the MTC4BT: there is also a very good serial monitor in Visual Studio Code / Platform.io.
Rocrail Setup
Download and install Rocview on your computer.
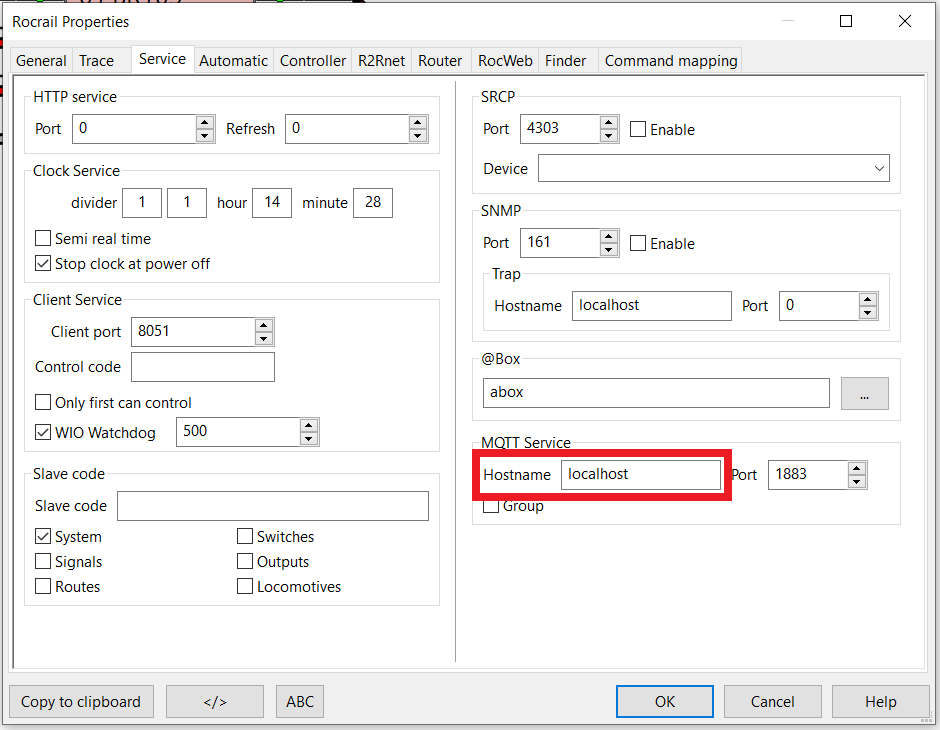
Required settings:
- Tab “Service”
- Rocrail Properties (menu File / Rocrail Properties)
- MQTT Service
- Hostname: IP address of the MQTT broker (e.g. localhost)
- MQTT Service
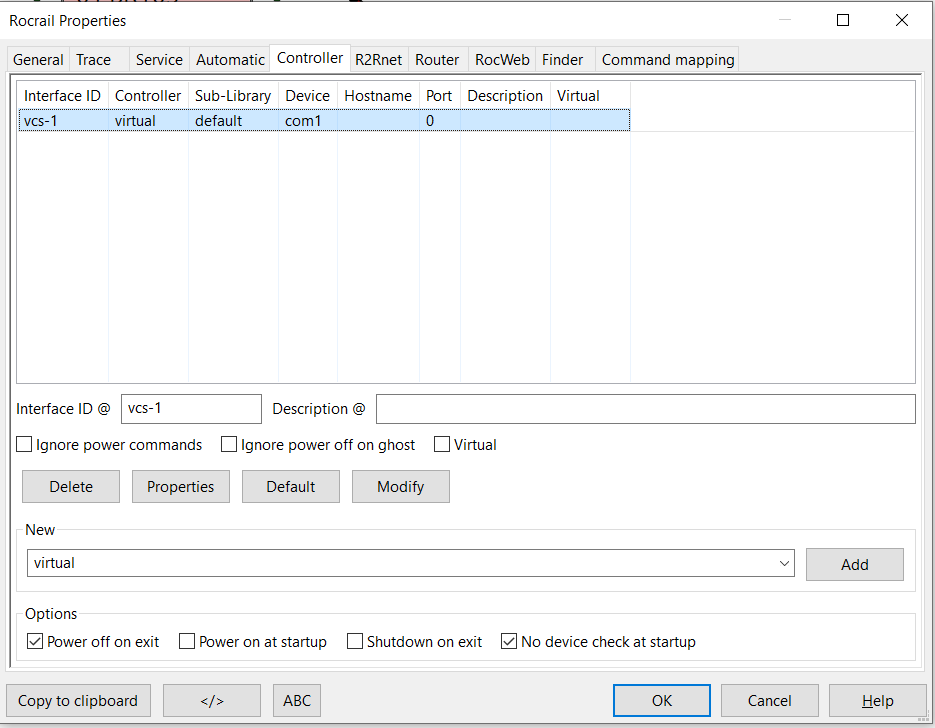
- Rocrail Properties (menu File / Rocrail Properties)
- Tab “Controller”
- Add the “virtual” controller.
- Rename it to “vcs-1” or similar.
Problem Fighting
- If Rocrail does not receive sensor events from the MattzoController, you should first check if the controller has booted correctly. If this is not the case, it may help to disconnect LEDs or sensors from the micro controller and try again.
- Then you should check if the controller has successfully connected to WIFI. Make sure that you have sufficient WIFI coverage at the desired location of the controller. Rebooting the controller (something multiple times) may also help, especially on ESP-32 boards.
- Check if the controller has successfully connected to MQTT. If you use mosquitto, it may help to subscribe to the MQTT broker with the command line “mosquitto_sub -t # -v” and check if there are incoming messages from the controller at all. Make sure you enable anonymous inbound connections if using mosquitto 2.0 or above as described in the MQTT section!
- Check if Rocrail is configured correctly.
Tips and Tricks
- Make sure that all network nodes have permanent and sufficient WIFI reception!
- Make sure that the controllers have sufficient power supply. This applies especially to the MattzoSwitchController, but in general also to the other controller types!
- Reduce anything that could cause lags and delays on your computer, e.g.:
- Switch off “Trace” in Rocrail settings.
- Do not run mosquitto in verbose mode when actually operating real trains.
- Switch off desktop background slide shows that load complex pictures.
- Switch off complex screen savers.
- Stop clients like Dropbox, OneDrive, iCloud or other cloud upload/download software. They demand significant processing and network ressources on your computer and may come to live arbitrarily.
- Switch off syslog and too verbose logging in the MattzoController network configuration. The maximum log level in MLC, MTC4PF and MTC4PU should be LOG_INFO.
- If you not attending your layout, power down all MattzoSwitchControllers for security reasons. If a switch motor is trying to turn to a position that it can not achieve, it will block, overheat and eventually break. MattzoSwitchControllers are trying to turn the servo motor as they are told from Rocrail. It is important to note that a simple configuration error can cause the switch motor to overheat! PLEASE TAKE THIS WARNING SERIOUS. I have reports of a user who literally BURNED off an ESP-8266 micro controller. With “burn” I mean: it went on flames! Okay okay, the guy connection the controller to a car battery, but be careful anyway!
How to contribute
The code is managed as a git repository on Github. Maintenance and enhanvements are mainly done by Mattze and other members of the MattzoBricks core development team.
If you would like to join the MattzoBricks core development team, send an e-mail to info@mattzobricks.com.
We think about setting the git repository to public, maybe from firmware version 1.0.
Hi Mattze,
I have built some controllers and all of them have no trouble connecting to the local WiFi. I also have put in the computer’s IP that hosts mosquitto in the “MattzoController_Network_Configuration.h” (and that is the same computer that runs rocrail). However, none of my controllers can connect to mosquitto. I do not have a real overview of the mosquitto.conf and what I need to adjust. Could you tell/sent me the important configurations of mosquitto? I am working on it for some days now and I just do not get it to connect.
Thanks,
Uli
Hi Ulrich (and Matthias),
I encounter the exact same problem with my controllers. They connect to the wifi with no problem but keep trying to connect to the MQTT broker unsuccessfully although the correct computer IP has been provided in the network configuration file. Have you been able to fix it yet?
Thanks,
Lucas
Not yet – we are working heavily on firmware 0.3 at the moment. We will check it out soon. Which version of mosquitto are you using?
Ulrich, Lukas: I have investigated the problem and added some additional instructions for mosquitto 2.0 and above. Hope it works now!
Ulrich, Matthias,
Even with the steps followed, mosquitto 2.0.3 still won’t work properly. I ended up downgrading to mosquitto 1.6.8 and now everything works flawless… I guess it is a hit or miss with the 2.0+ versions. I’ll keep testing and see if I can get it to work 🙂
Greetings,
Lucas
Hi Lucas,
I’m running Mosquitto v2.0.2 without any issues. In my Mosquitto config under `Listeners` I enabled a listener on a specific IP address (port 1883) and under `Security` I enabled anonymous access (because I thust all devices on that specific network anyway): `allow_anonymous true`. That’s all.
Obviously I also had to allow port 1883 through the firewall of my machine. Please note Mosquitto itself sets a few firewall rules after install by default. Those were too restrictive for me so I had to disable some of them.
I have confirmation of multiple users that they operate successfully on mosquitto 2.0 with the mentioned configuration.
Hi Mattze and Raymond,
I got Mosquitto 2.0.4 to work. When editing the .conf file of Mosquitto after installation I forgot to remove the # to ‘uncomment’ the value. This is mentioned in the first few lines of the configuration file which I totally missed. After that, I realised the steps above described making a new simple configuration file instead of editing the one provided by default after installation, creating practically the same result. I guess I got too excited to get the trains running and skipped a line or two. If only I would have read the section carefully…
I truly am an idiot *facepalm* 😀
Sorry for the fuss and my thanks to both of you for your help and patience!
All the best,
Lucas
I have been actively working on my MattzoSensorControllers for the past few days and it now successfully connects to both wifi and Broker, but wont tell me his Adress. In the “First Boot” Section it is described as simply restart the controller, but how do I do that? I have researched on Google and couldnt find a answer yet, so i thought I could just ask here.
Regards
Flec
Hello Piet,
all ESP32s that I am aware of have a reset button.
By the way, we have a forum now where you can post technical questions!
Cheers,
Mattze
Hi. I just start learn about Mattzo FW.
but I cannot find the way to config MQTT user and password.
Could you help to tell me how to set.
Welcome to Mattzobricks! I recommend to read the instructions carefully at first. In case you still need support afterwards, there is forum on the Mattzobricks website.