The page applies to firmware version below V1.0 only. We recommend to work with the most recent firmware version only!
Previous version of the MattzoController firmware used the Arduino IDE to compile and upload the source to the controller. This applies for the following MattzoController types up to firmware release 0.6.x:
- MattzoLayoutController (MLC)
- MattzoTrainController for Power Functions (MTC4PF)
- MattzoTrainController for Powered Up (MTC4PU; deprecated)
From firmware release 1.0, all controllers use VSCode with platformIO instead of Arduino IDE.
Instructions
Apply the following instructions how to download, configure and upload firmware 0.6.x and below.
Download Arduino IDE
You need the Arduino IDE to compile and upload the firmware to the microcontroller.
Download the installer directly from the download section of the Arduino website. We recommend NOT to download the Arduino IDE via Microsoft Store.
Install Arduino Board Managers
As we are using the ESP8266 platform for the MLC and MTC4PF, you need to add the following Board Manager URL to the Arduino IDE (Menu File / Preferences, Additional Board Manager URL):
- ESP 8266
- https://arduino.esp8266.com/stable/package_esp8266com_index.json
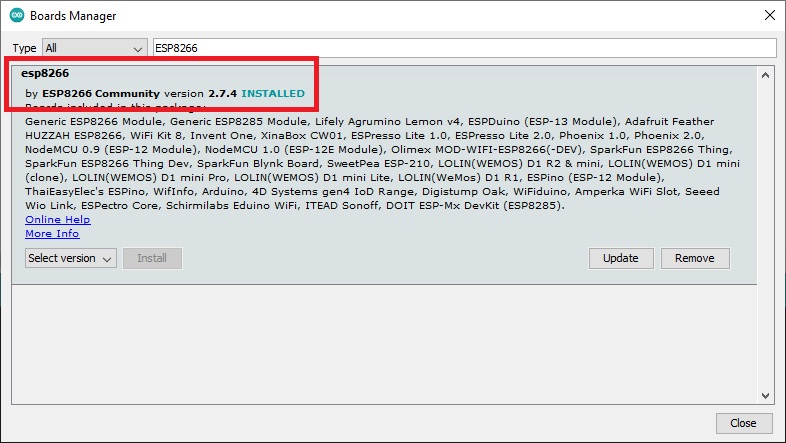
- Supported version: 2.7.4 only.
- Attention: the firmware will not work correctly with board manager 3.0.0 and above.
In case you want to try the MTC4PU (included in the package up to version 0.5.1), your platform will be the ESP32. In this case, you need to add the following Board Manager URL:
- ESP 32
- https://dl.espressif.com/dl/package_esp32_index.json
- Tested version: 1.0.4
- Newer versions may also work (untested).
Install Arduino Libraries
The MattzoController firmware requires some code libraries. The required libraries depend on the MattzoController type. The libraries can mainly be downloaded easily from the Arduino IDE by using the built-in library manager (menu Tools / Manage Libraries). Details and exceptions are described in the main source code file (MTC4PF.ino or MLC.ino) for the specific MattzoController.
Configure the firmware
Firmware 0.6.x
The file and folder structure has changed with firmware 0.6 significantly, to make installation and management of the firmware easier and more transparent.
After you have unzipped the firmware, you need to change the name of two folders:
- MattzoController\MLC\conf\default -> MattzoController\MLC\conf\my
- MattzoController\MTC4PF\conf\default -> MattzoController\MTC4PF\conf\my
For advanced users: the “my” folders are under an gitignore policy, which is important you users that use the firmware via a git checkout. If you have no idea what that means: don’t arrow, it’s not important for you.
Now you need to edi the files in the “my” folders, which are:
- network_conf.h
- controller_config.h
The network_conf.h file contains important network settings like WiFi access data etc. Understanding and editing the parameters in this file is relatively easy.
The controller_config.h file is more complicated. To give you a quick start, we have compile various example file in the MattzoController\MLC\conf\examples folder. If you have identified the example file or your choice, you may copy it over the controller_config.h file and use it instead.
Firmware 0.3 – 0.5.x:
Attention: this section applies to firmware releases up to 0.5.1 only. Please consider to update to the latest firmware version.
You need to copy the header file MattzoController_Network_Configuration.h to the library directory of the Ardunio IDE and enter your network settings.
You need to move (do not copy – move!) the folder “libraries/MattzoBricks” including its contents to the Arduino libraries folder. The files are required by the firmware for the various controller types and included in the compilation process before uploading the firmware.
The type specific firmware sketches have their own additional configuration files. The configuration files may be copied in order to maintain different configurations for e.g. two different MTC4PU controllers controlling different trains.
Compile and Upload the Firmware
To compile the firmware, you need to start the Arduino IDE and load the MTC4PF.ino or MLC.ino file.
To upload the firmware, you would normally connect the controller via USB to your computer. Please note that you might need a USB driver specific to your microcontroller in order to establish the connection via USB. After the controller is connected via USB, select the correct board from the Board manager, choose the USB port and hit Ctrl+U (Upload). This will compile the firmware and upload it to the controller.
Attention: make sure your USB cable is capable of transmitting data instead of just transmitting power. You need an USB data cable!
MattzoControllers also features OTA (over the air) firmware updates. This way, you can update the firmware via WiFi without USB connection after it has been successfully installed for the first time. To do OTA uploads, choose the OTA name (usually the hostname) of the controller instead of the USB port. If you wonder why OTA is important, imagine a layout with 25 MattzoLayoutControllers and 30 MattzoTrainControllers, and all controllers carefully inserted into your LEGO layout or trains. Updating all of these controllers via USB would be a nightmare.
Step-by-step Guide
Follow these steps to upload the firmware on your first MattzoController:
- Arduino IDE
1.1 Install Arduino IDE (https://www.arduino.cc/en/software)
1.2 Start Arduino IDE - Firmware
2.1 Download firmware (https://mattzobricks.com/de/controllers/firmware-history-and-roadmap) - Customize MattzoController_Network_Configuration.h according to your network settings
3.1 SSID
3.2 PSK
3.3 MQTT IP
3.4 OTA_PASSWORD - USB Driver for ESPs
4.1 Download drivers here: https://42project.net/treiber-fuer-den-ch340g-seriell-zu-usb-adapter-oft-auf-arduino-uno-r3-boards-verbaut/
4.2 Install the drivers (othervise a connection to your ESP trough a COM port won’t work) - Arduino IDE Boards
Additional Ressource: https://arduino-esp8266.readthedocs.io/en/3.0.2/installing.html#boards-manager
5.1.1 Add additional Board Manager URL (ESP8266): https://arduino.esp8266.com/stable/package_esp8266com_index.json (comma seperated)
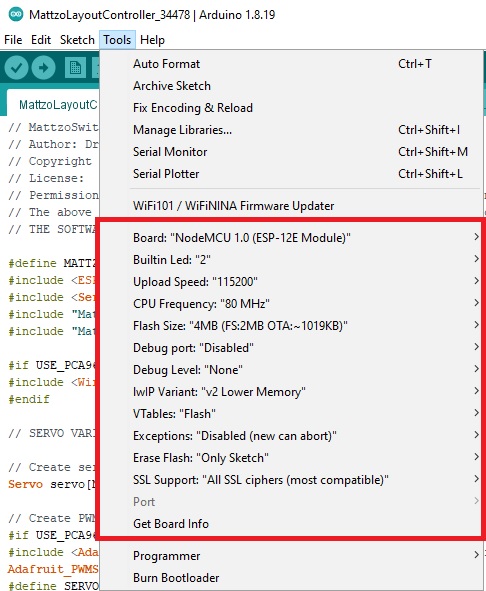
5.1.2 Tools -> Board * -> Boardmanager -> ESP8266 by ESP8266 Community -> Version 2.7.4 only (04.02.2022)
5.1.3 Review your board settings
5.2.1 Add additional Board Manager URL (ESP32): https://dl.espressif.com/dl/package_esp32_index.json (comma seperated)
5.2.2 Tools -> Board * -> Boardmanager -> ESP32 Arduino -> Tested version: 1.0.4 (04.02.2022)
5.2.3 Review your board settings - Arduino IDE Libraries
Additional Ressources: https://docs.arduino.cc/software/ide-v1/tutorials/installing-libraries
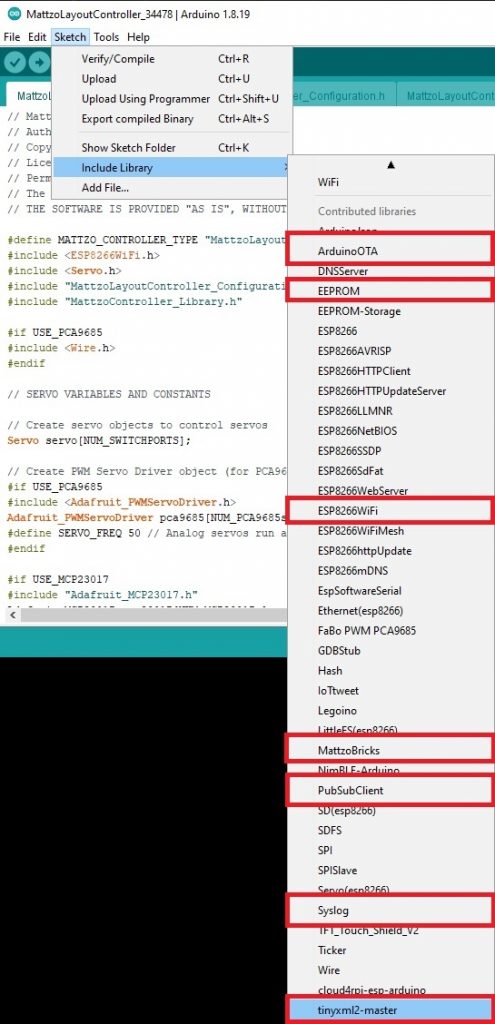
6.1 EEPROM (built in)
6.2 PubSubClient (PubSubClient by Nick O’Leary – tested with version 2.8.0)
6.3 Arduino OTA (ArduinoOTA by Juraj Andrassy – tested with version 1.0.7)
Addiational Ressource – Importing a .zip Library: https://docs.arduino.cc/software/ide-v1/tutorials/installing-libraries
6.4 TinyXML2 (https://github.com/leethomason/tinyxml2. Verify tinyxml2-master trough “Menu -> Sketch -> Include Library)
6.5 Syslog (https://github.com/arcao/Syslog. Verify syslog-master trough “Menu -> Sketch -> Include Library”)
6.6 MattzoBricks library file/-s. Move the files into a new subdirectory called “mattzobricks” in your Arduino library folder.
After installation and configuration, you should be able to upload the MattzoBricks firmware to the MattzoController.
Pictures and Screenshots