
Purpose
The MattzoLayoutController controls boom barriers, level crossing lights and sensors.
Functional Description
The MattzoLayoutController (MLC) is a device that controls the components of the level crossing: boom barriers, lights and sensors.
In terms of Level Crossings, the MLC has the following features:
- Works with Rocrail or autonomously.
- Support for primary and secondary booms.
- Secondary booms can be configured to close with a delay.
- All servo start and stop angles can be configured.
- Closing and opening speed of the boom barriers can be configured separately.
- Right hand and left hand road traffic configurable.
- Flashing lights with configurable speed.
- Configurable fading lights for enhanced realism.
- Intelligent, powerful and flexible train axle counting logic for autonomous operation.
- Works in an outstandingly large number of different track layout scenarios.
- Multi-track support.
- Virtual sensors for secure closing of barriers before train passes the level crossing.
- Support for various hardware deployment scenarios.
- Based on MattzoLayoutController firmware.
- Common codebase with other controller types.
Media
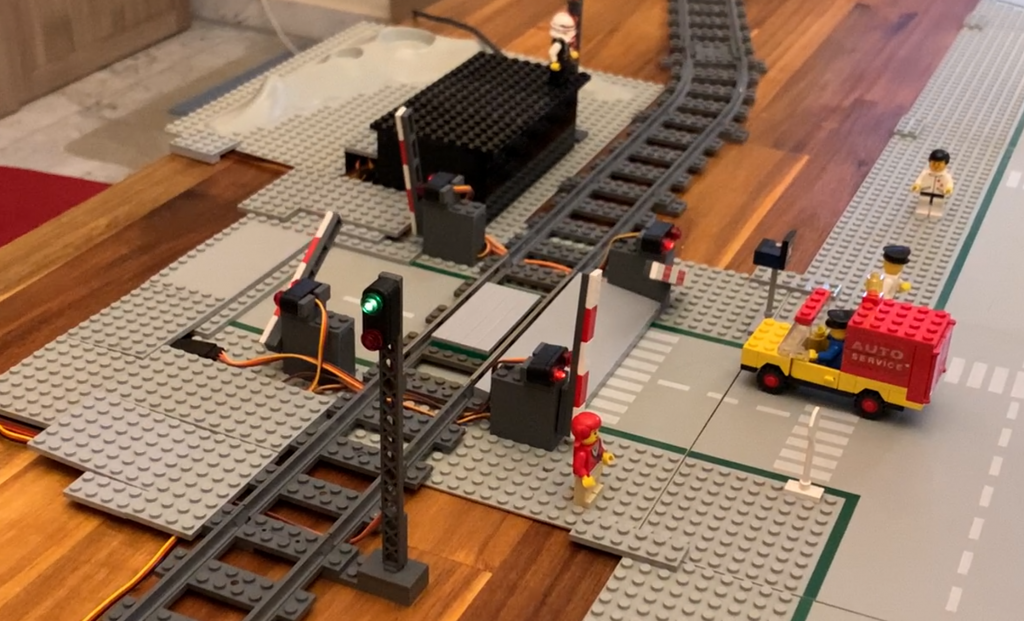
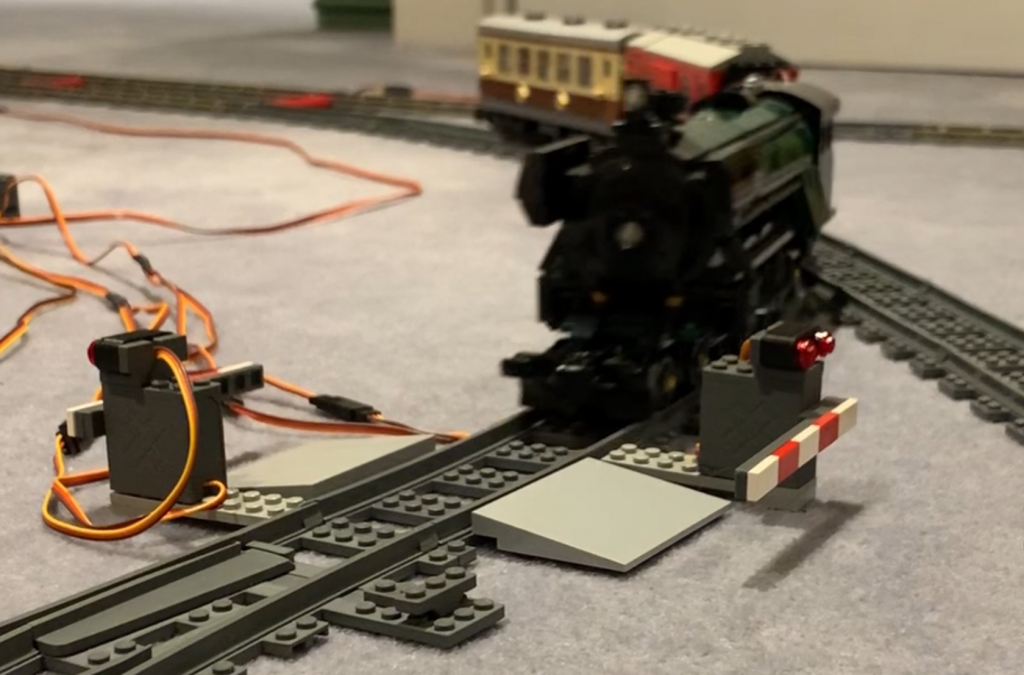
Before getting to the details, we recommend to have a look at the following video. There is also a German version available.
Design Principles
The basic requirement for a level crossing controller is obviously, that whenever a train approaches the level crossing, the boom barriers close and the lights flash alternating. When the trains has passed the level crossing, the boom barriers open and the lights stop to flash.
The idea is to count train axles that pass the tracks ahead and behind the level crossing. This is done with sensors. When the loco or the first waggon has contact with specific sensors ahead of the level crossing (so called “inbound sensors“), the boom barriers close, and the number of axles passing the sensor is counted. When the number of counted axles on a corresponding sensor behind the level crossing (the “outbound sensor“) equals the number of contacts on the inbound sensor, the controller knows that train has fully crossed the level crossing and the boom barriers open.
In case of multiple tracks are leading over the level crossing, an occupation state is kept for each individual track. When all tracks are vacated, the boom barriers open. If one or more tracks are occupied, the boom barriers close.
Sensors and Magnets
We propose to generally use our reed switches as sensors, because they work extremely reliably and are easily to integrate into the tracks. The placement of magnets in the loco and waggons to trigger the sensors should follow these rules:
- Place a magnet in the first vehicle (usually “the loco”) and in the last vehicle (usually “the last waggon”) of your train. This ensures that the boom barriers stay closed until all vehicles have passed the level crossing, but still opens right after the last vehicle has passed the crossing.
- The distance between the magnets in the train must must not be greater than the distance between the inbound and outbound sensor. This means, that you may have to add magnets to some waggons in the middle of the train. If this requirement is violated, the boom barriers will open before the train has left the crossing, and then close again after the next magnet triggers the inbound sensor again.
Operational Modes
The MattzoLevelCrossingController can be operated in differents modes:
- Autonomously without Rocrail (“Autonomous Mode”),
- controlled by Rocrail (“Rocrail Mode”),
- in a mixed mode (“Hybrid Mode”).
In Autonomous Mode, the MattzoLevelCrossingController is operated independently of Rocrail or another train automation software. The advantages of the autonomous mode is that no Rocrail setup and connectivity is required. A disadvantage is that inbound sensors need to placed at quite a distance from the level crossing if you work with fast trains, and that you need a galvanic connection between all of those sensors and the MattzoLevelCrossingController in this mode. Further more, the level crossing sensors can not be used by Rocrail for other purposes.
In Rocrail Mode, Rocrail triggers the boom barriers and lights of the level crossing. This requires a bit of setup in Rocrail, but in standard situations it is not too complicated if you follow the steps below. Using Rocrail, it is possible to cope with complex situations like supporting multiple routes leading over the level crossing, and closing the boom barriers well in advance before a train arrives. Additionally, all of the sensors are fully available in Rocrail and can also be used as block sensors, which reduces the overall amount of required sensors. The Autonomous Mode is also the only mode in which you see the status of the level crossing in Rocrail. You can also reconfigure the opening / closing logic in Rocrail without having to recompile the firmware.
Hybrid Mode is a combination of Autonomous Mode and Rocrail Mode. The hybrid mode uses the specific advantages of the two other modes. The MattzoLevelCrossingController decides to open or close the barriers autonomously, while the controller does not need to handle all of the sensors alone.
Summarized, the conceptual differences of the three modes are as follows:
| Mode | Autonomous Mode | Hybrid Mode | Rocrail Mode |
| Open/Close Decision | MattzoController | MattzoController | Rocrail |
| Sensor Deployment | All sensors must be attached to MattzoLevelCrossingController | Sensors may be attached to any MattzoController | Sensors may be attached to any MattzoController |
| Sensor usage | Level crossing only | Level crossing and blocks | Level crossing and blocks |
| WiFi connection to Rocrail | Not required | Required | Required |
When to use which mode?
- If you do not use Rocrail, or want the level crossing to work without Rocrail, use the Autonomous Mode.
- If you do not want to bother around with configuring the level crossing in Rocrail, but want to use sensors for the level crossing and automation at the same time, use the Hybrid Mode.
- If you want to a) use the flexible and powerful Rocrail configuration features, b) need to setup the level crossing for complex track layout situations, or c) want to be able to configure the level crossing without having to recompile the firmware, or d) want to see the opening / closing status of the level crossing in Rocrail, use the Rocrail Mode.
I (Mattze) personally prefer the Rocrail Mode, but it’s a personal choice. The other modes can very well also make sense, especially in standard situations or when you are new to configuring Rocrail.
Autonomous Mode Scenarios
This section applies to Autonomous Mode only.
Let’s focus on the Autonomous Mode first and learn a bit about the different strategies of how to setup an automatic level crossing. Nevertheless, the principles described in this section can also be applied to Rocrail Mode. So it’s a good idea to read this chapter carefully, even though you are planning to deploy your MattzoLevelCrossingController in Rocrail Mode.
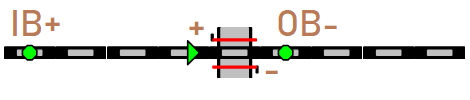
The simpliest situation when building a level crossing is, when you have a single, unidirectional track. Place an inbound sensor ahead of the level crossing, and an outbound sensor behind it. The inbound sensor should have sufficient space from the level crossing, so that the boom barriers have enough time to close until the train has reached the crossing. When the train triggers the inbound sensor, the boom barriers close. When the train has triggered the outbound sensor as many times as the inbound sensor, the boom barriers open.
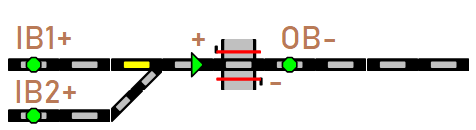
In the next scenario, there are two converging tracks ahead of the level crossing, while the track is still a one-way route. The inbound sensor can not be placed ahead of the level crossing, because the distance to the crossing would be too small. In this case, you can place two different inbound sensors ahead of the level crossing.
Now we have a look at bidirectional tracks. Lets start with a simple setup in which we have only one sensor on each side of the level crossing. Trains can come from both directions. If a train approaches from one side, the sensor acts as the inbound sensor and triggers the closing action of the boom barriers. After having passed the crossing, the other sensor acts as the outbound sensor. When the train has triggered the outbound sensor as many times as the inbound sensor, the boom barriers open.

The deployment scenario just described has a disadvantage: you may feel that wherever you place the sensors, the distance between the crossing and the sensors is either too large or too small, but never quite right. The boom barriers either do not close on time, or it takes too long until they reopen.
The solution is to split the inbound and outbound sensors in either side into two sensors. The outer sensor acts as “inbound” sensor, the inner one as “outbound” sensor.
Imagine a train approaches from the left side. The loco hits the first sensor, and the boom barriers close. After hitting the sensors just behind the level crossing for as many times the inbound sensor left of the crossing was triggered, the boom barriers open again. When the train continues and moves over the right-most sensor (which is the inbound sensors of the right side of the crossing), nothing happens because the inner logic MattzoLevelCrossingControllers has remembered that there is still a train moving from left to right over the area of the level crossing.

In some situations it may not be possible to place two different sensors one side of the level crossing. The following example shows an example were the inbound and outbound sensors of the left side of the crossing are separate, but on the right side they are united in a single sensor. This is conceptually absolutely no problem, and the MattzoLevelCrossingController can deal with this setup without a problem.

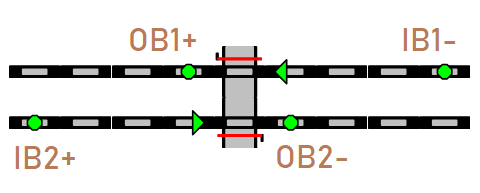
Now let’s add a bit more complexity to our setups, and have a look at double track systems. Still a relatively easy, yet very frequently existing example is a double track level crossing with unidirectional tracks. We simply add one inbound and one outbound sensors ahead of the level crossing for each track. The level crossing closes, when a train approach on any side, and will open as soon as all tracks are free again.
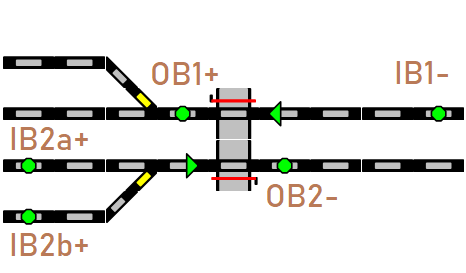
The next example also uses unidirectional tracks. Please note that the lower track has two inbound sensors (IB2+, IB2b+), which both lock the lower track and trigger the closing of the boom barriers. The upper track has only one inbound sensor (IB1-) and one outbound sensor (OB1+). That the track forks into two separate tracks does not play a role, as long as the outbound sensor is always triggered right after the crossing.
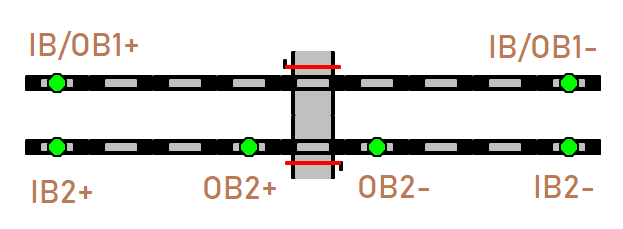
The next example displayes a level crossing over two bidirectional tracks. The upper track has combined inbound and outbound sensors on each side, the lower track has separate sensors.
This specific deployment may make sense if on the upper track only slow trains are operating, while on the lower track high speed trains fly over the layout, which require a significantly earlier closing of the boom barriers.
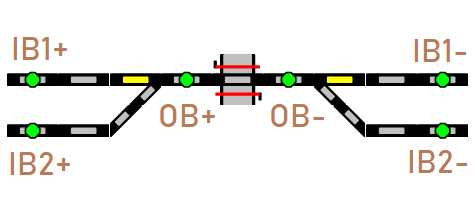
The following example shows a level crossing over a single, bidirectional track. Each side has two inbound sensors, and one outbound sensor. Whatever route the trains chooses, the MattzoLevelCrossingController derives the correct actions of when to close and open the boom barriers by comparing the number of counts on the in- and outbound sensors on the left and right side of the level crossing. It does not matter for the counting over which inbound sensors the train came – just the side from were it came is relevant.
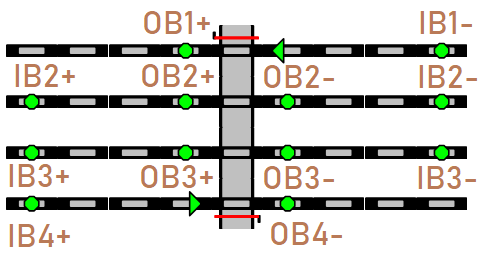
The next scenario shows a level crossing that spans over four tracks. The inner tracks are bidirectional and have separate inbound and outbound sensors on each side, the upper and lower track and unidirectional and have only one inbound and outbound sensors each.
As you can see, the Autonomous Mode has a lot to offer and can help you automate you level crossing in a very large number of different scenarios.
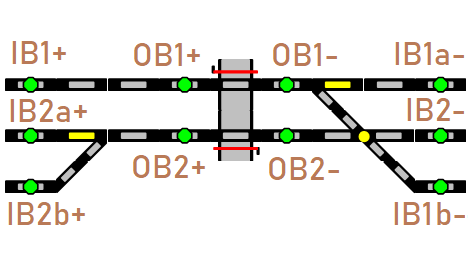
Still too easy? Then let’s have a look at the next example. On the left side, we have the lower track forking into two separate tracks. Each of those tracks has its own inbound sensor (IB2a+, IB2b+), adding up in three inbound sensors on the left side in total.
On the right side, the upper track is split into a straight track and a diverging track, which leads over the lower track with a crossing. So if you have a look at the sensors on the far right side, then the top-most (IB1a-) and lowest sensor (IB1b-) are both inbound sensors for the upper track, and the sensor in the middle (IB2-) is the inbound sensor for the lower track.
Please note that we are indeed talking about a CROSSING, and not a single or double slip switch. If you add a switch instead of a crossing, a train may trigger an inbound sensors for one track, but later triggers an outbound sensor for a different track. This is not going to work, at least not in Autonomous Mode. Of course you can build such scenarios, but then Rocrail Mode would be required to get it right.
Firmware Configuration
Please read the MLC general page first.
To configure the firmware configuration, you need to edit the controller configuration file (controller_config.h).
In this file, the following sections are relevant:
- SERVO WIRING CONFIGURATION (for boom barriers servos),
- LED WIRING CONFIGURATION (for the flashing lights),
- SENSOR WIRING CONFIGURATION (for the sensors), and
- LEVEL CROSSING CONFIGURATION (for the overall operation of the level crossing).
The sections are clearly marked in the standard configuration file, and the different parameters are explained with code comments, so you shouldn’t have too many problems to understand what you need to do.
To configure the MattzoLayoutController firmware to operate a level crossing, you may use the example configuration file “MLC_conf_LevelCrossing.h” as a template.
Rocrail Setup
This section applies to Rocrail Mode only!
If the MattzoLevelCrossingController works in Autonomous Mode or Hybrid Mode, there is nothing to configure in Rocrail. For Rocrail Mode though, some configuration work in Rocrail is required.
Setting up single track level crossings in Rocrail is relatively easy. The boom barriers are basically handled like a “switch” Rocrail. This “switch” has, like any other standard switch, two switching positions: straight (boom barriers closed), and turnout (boom barriers open). Setting the “switch” to straight means to close the barriers and vice versa.
There is a dozen of different way of setting up level crossings in Rocrail. I will focus on some scenarios and describe a possible solution for each of them.
Example 1: Unidirectional single track level crossing using Routes
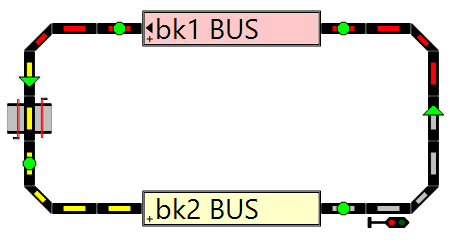
This first example is kind of a “hello world” scenario. Imagine you have just build your first automated LEGO train layout, and it looks like this:
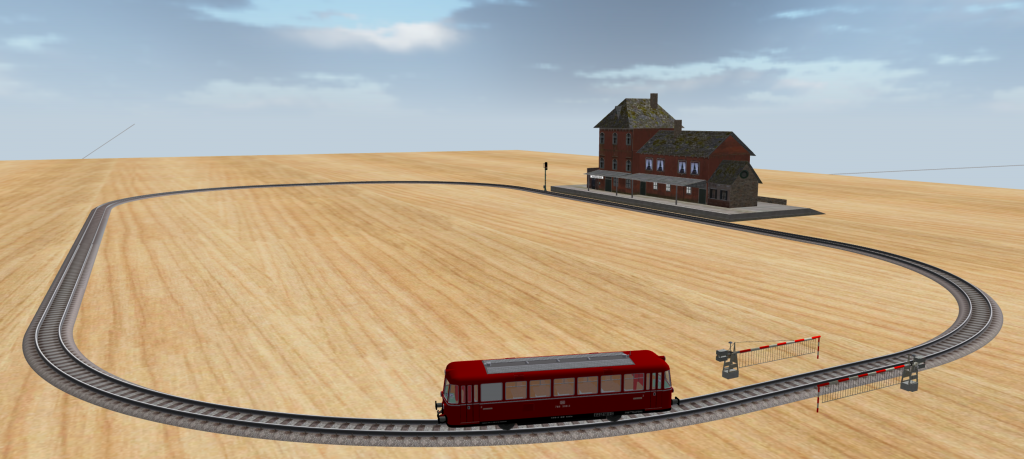
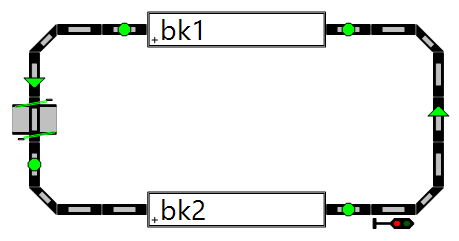
The oval has two routes, one from bk2- to bk1- and the other one from bk1+ to bk2+ (see Rocrail plan below). We are using the lock and unlock events of the routes to open and close the level crossing. When route [bk1+]-[bk2+] is locked, the level crossing closes. When [bk1+]-[bk2+] is unlocked, the level crossing is released.
Follow these steps to setup this scenario:
1. Add the level crossing to your Rocrail track plan. The level crossing can be found in “Accessories” in the “Add item” window when editing the track plan. Connect it to your tracks. Assign an address (the MattzoController id) and a port (e.g. 1) on the interface tab of the level crossing properties. The track plan should look like this:
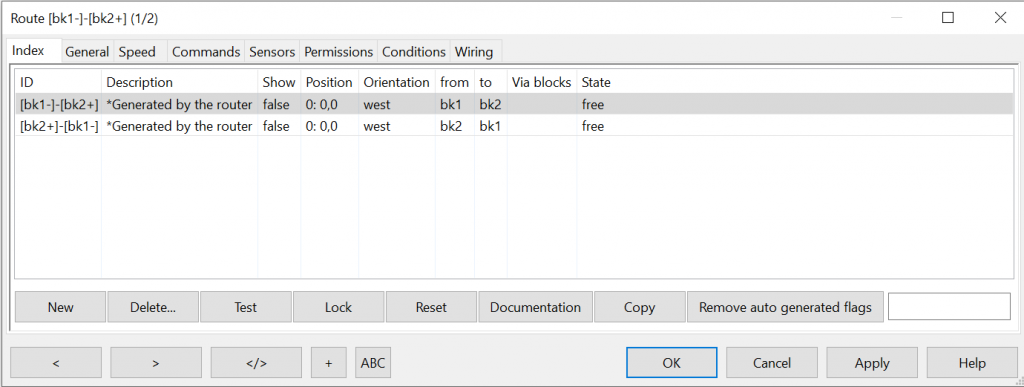
2. Let the router create routes for you (generally recommended) or do this yourself (only recommended in special cases). In the example above, the router would create two routes like this:
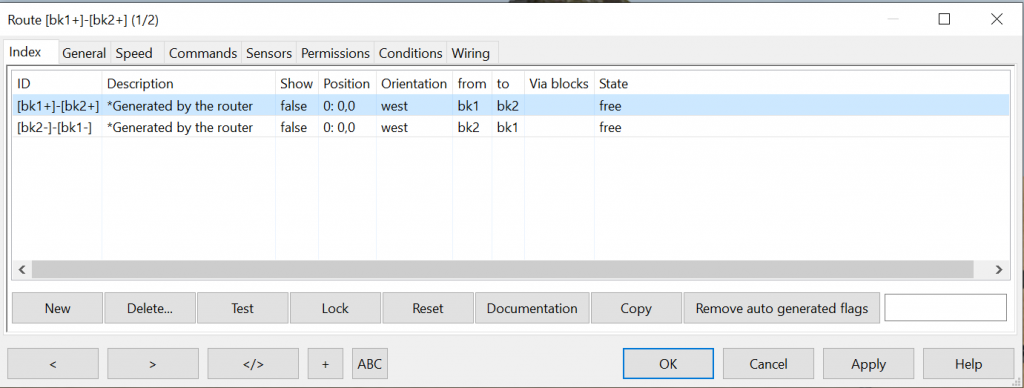
3. Select the “Commands” tab of the first route. Add two commands. The first one closes the level crossing (ID in the example: sw1) when the route is locked, the second one opens the level crossing when the route is released. The result should look like this:
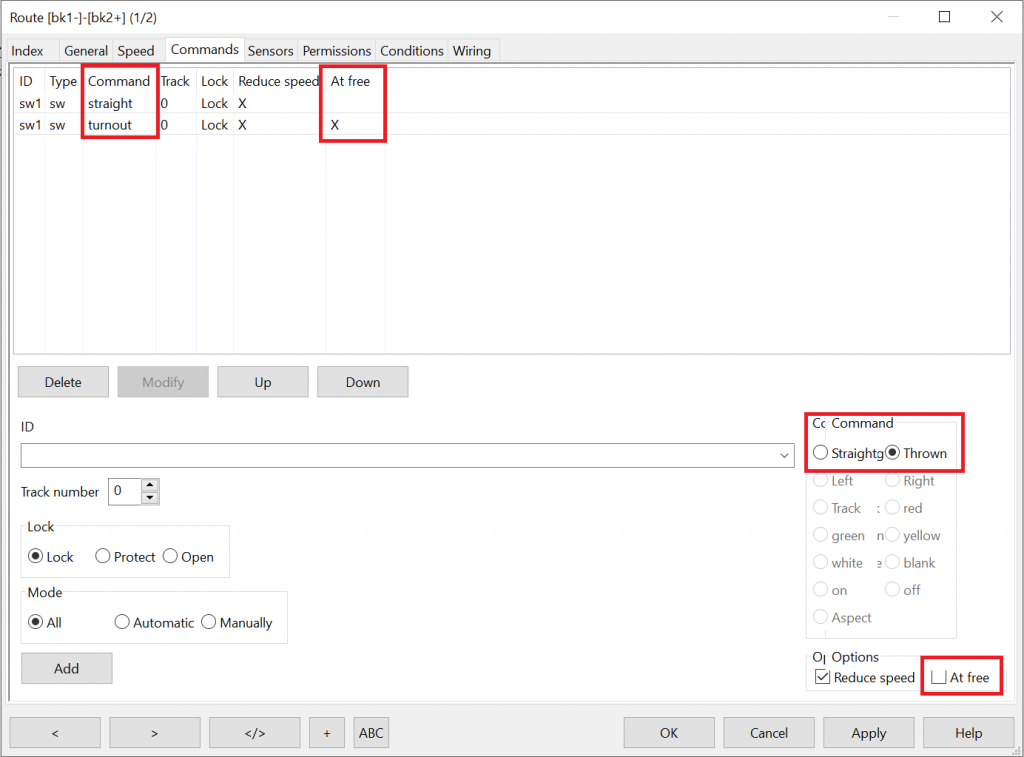
In my version of Rocrail, the UI had some bugs, so a bit of tinkering and experimenting is required to get it set correctly. After you have set the commands, it is advisible to close the dialog, open it again and check if your settings are stored correctly.
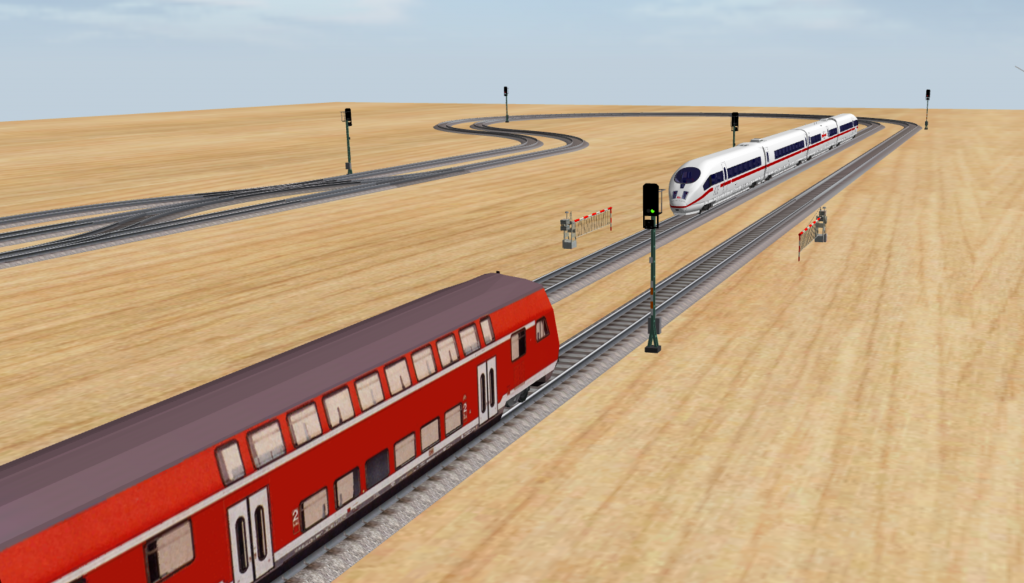
4. Test the level crossing by letting a train go in automatic mode the full loop from block bk2 to bk1 and back to bk2. The boom barriers will close when the route from bk1 to bk2 is locked, and open automatically when the route is unlocked. When the train moves over the level crossing, this should look like this in Rocrail:
Here you go: your first automated train layout with an automatic level crossing works.
Example 2: Bidirectional single track level crossing using Routes
Lets now take the next steps and move on to bidirectional tracks. Bidirectional tracks are tracks that do not have a one-way restriction and can be used in both directions. We will setup a simple commuter train layout, were the train moves from Block bk1 to Block bk2, changes direction and goes the same way back. This could look like this:
Follow these steps to add a single track level crossing for a bidirectional track to your Rocrail layout and automate it:
1. Add the level crossing to your Rocrail track plan. The level crossing can be found in “Accessories” in the “Add item” window when editing the track plan. Connect it to your tracks. Assign an address (the MattzoController id) and a port (e.g. 1) on the interface tab of the level crossing properties.
Example:

2. Let the router create routes for you (generally recommended) or do this yourself (only recommended in special cases). In the example above, the router would create two routes like this:
3. Select the “Commands” tab of the first route. Add two commands. The first one closes the level crossing (ID in the example: sw1) when the route is locked, the second one opens the level crossing when the route is released. The result should look like this:
Repeat this procedure for the second route as well. In my version of Rocrail, the UI had some bugs, so a bit of tinkering and experimenting is required to get it set correctly. After you have set the commands, it is advisible to close the dialog, open it again and check if your settings are stored correctly.
4. Test the level crossing by letting a train go in automatic mode from block bk1 to bk2 and vice versa. The boom barriers will now close and open automatically. When the train moves over the level crossing, this should look like this in Rocrail:

Example 3: Double track level crossing using routes and actions
Compared to setting up single track level crossings, dealing with double track level crossings in Rocrail is a bit more complicated. The reason is that the boom barriers can not simply be opened when a train has left the track – on the other track there might also be a train approaching! So the boom barriers must close when a train approaches, but may open only if all trains have vacated the level crossing.
In this example, we will use routes, and a more advanced feature of Rocrail: actions.
To keep this example simple and straight forward, this scenario uses unidirectional tracks only. Setting up double-track (or, more generally, multi-track) level crossings with bidirectional tracks requires a bit more of setup work, but it not too much more complicated if you have understood the basic idea.
Follow these steps to add a double track level crossing to your Rocrail layout and automate it using routes and actions:
1. Add level crossings to a double track on your Rocrail track plan. The level crossing can be found in “Accessories” in the “Add item” window when editing the track plan. Name them “lc01” and “lc02”. Make sure the two level crossings have the same interface address and port. This is required to let the boom barriers move synchronously whenever one of them is flipped. Connect it to your tracks. Make sure that the routes leading over your tracks are one-way tracks.
Example:
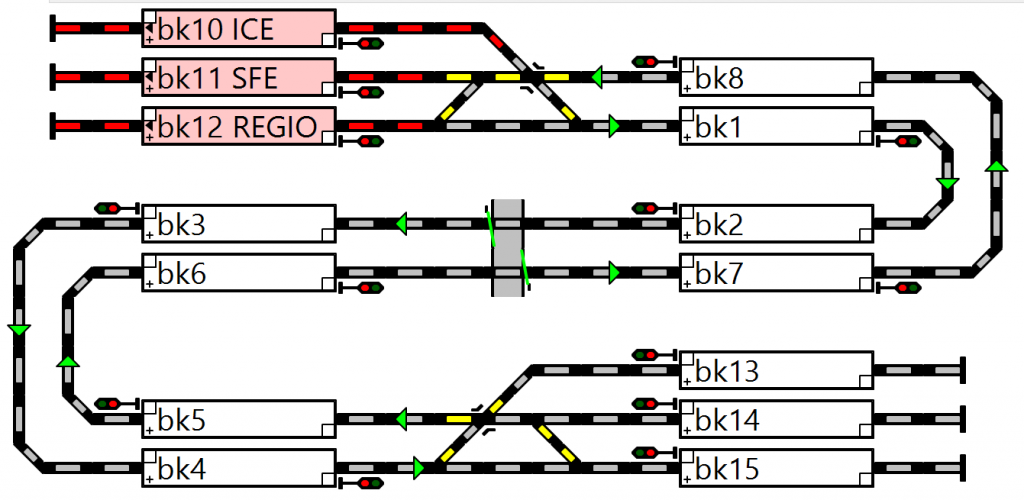
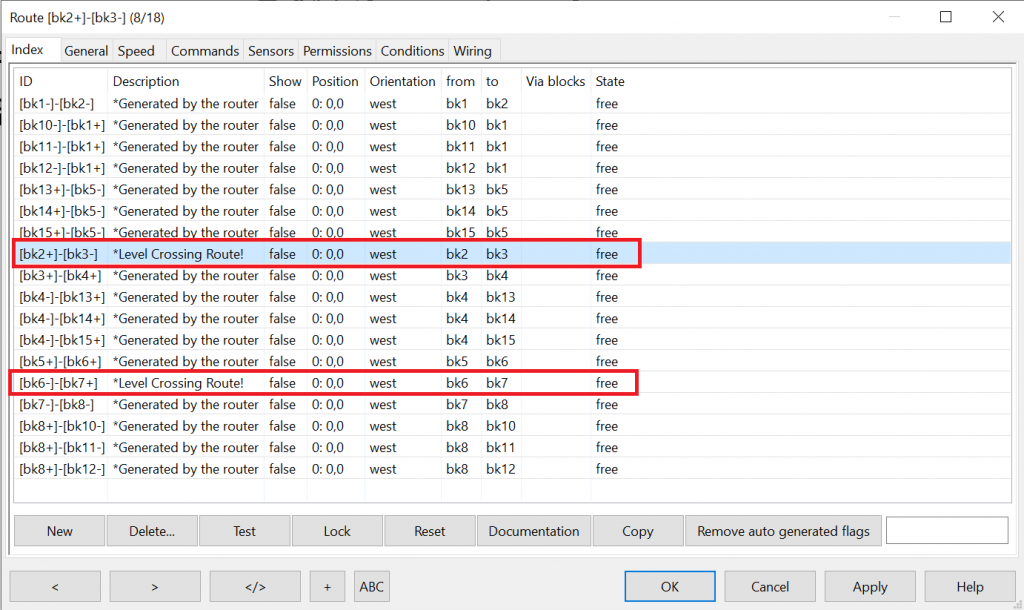
2. Let the router create routes for you (generally recommended) or do this yourself (only recommended in special cases). In the example above, the router would create several routes like this. The marked routes lead over the level crossing:
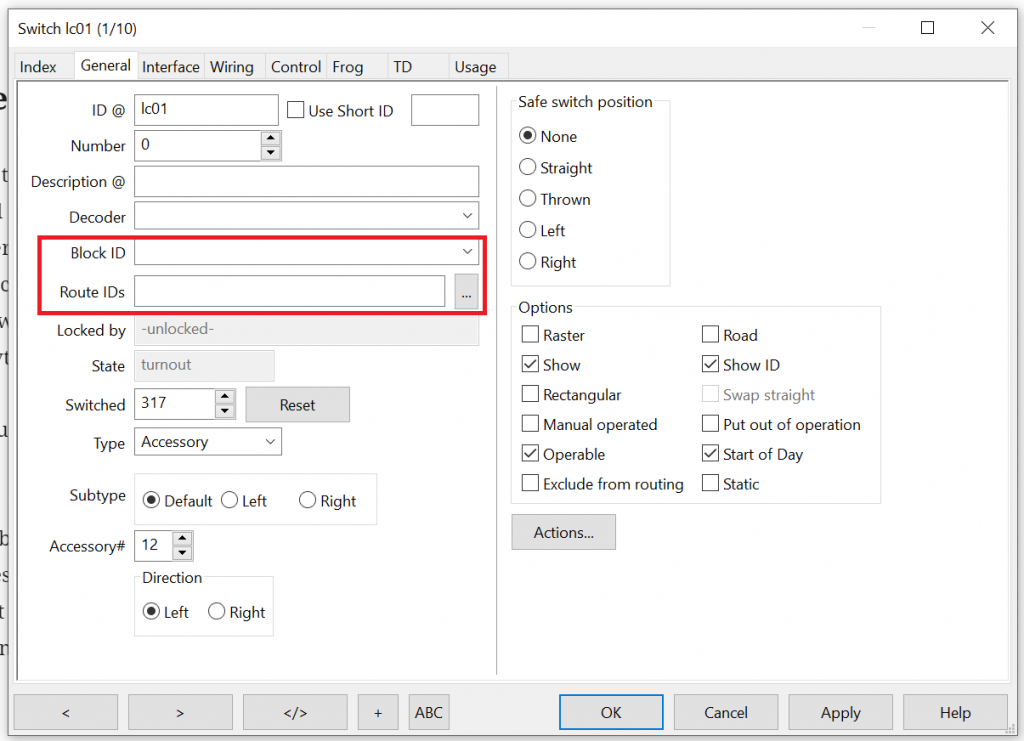
3. Edit the properties of both level crossing objects on the track plan. On the “general” tab, delete anything in the fields “Block ID” and “Route IDs”:
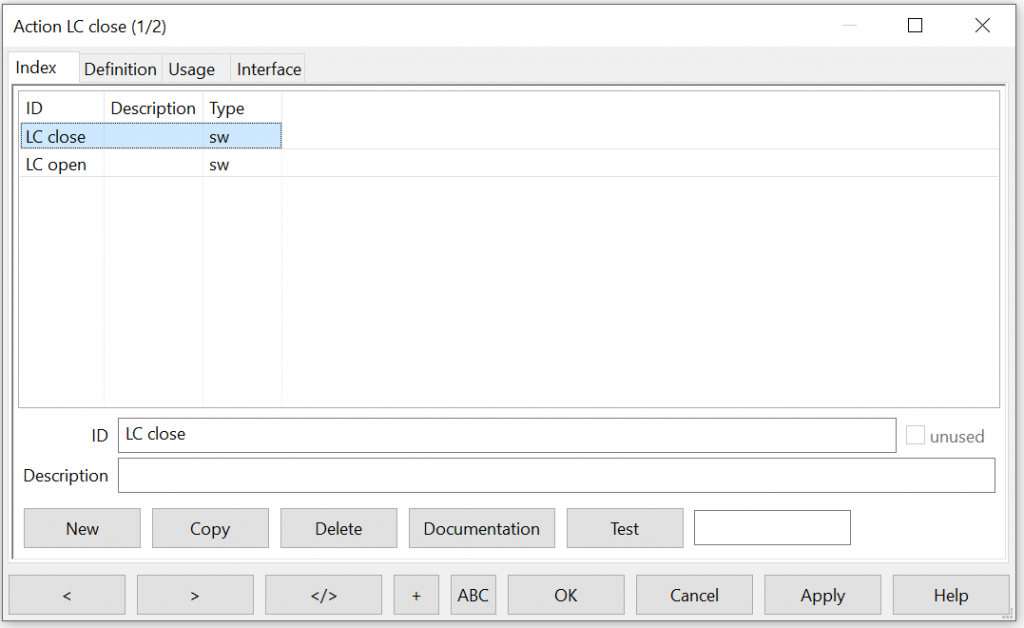
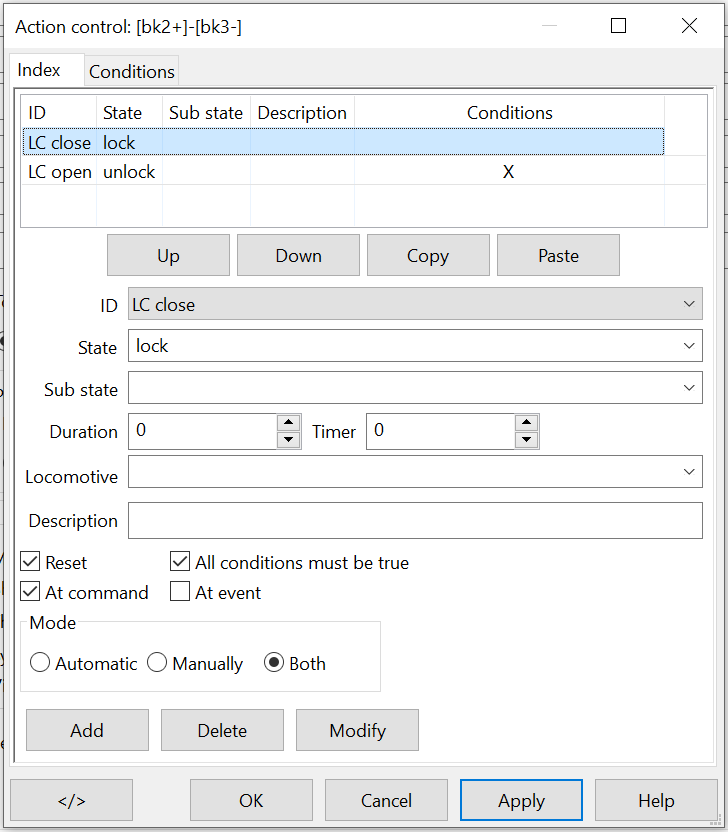
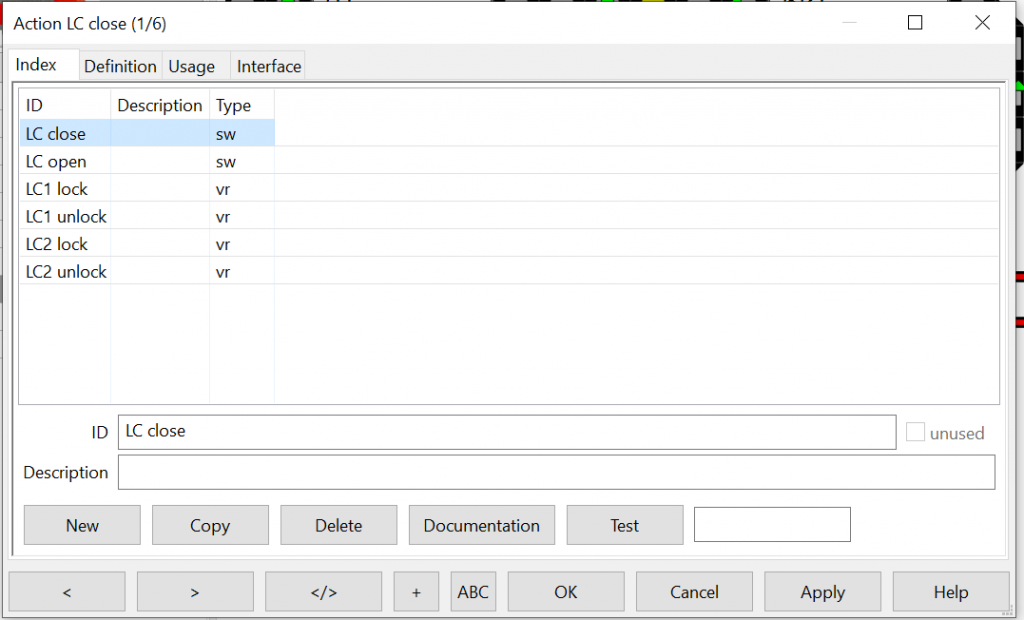
4. Now we need to add two actions (menu “Tables / Actions”). The first is for closing the boom barriers, the second one is for opening them.
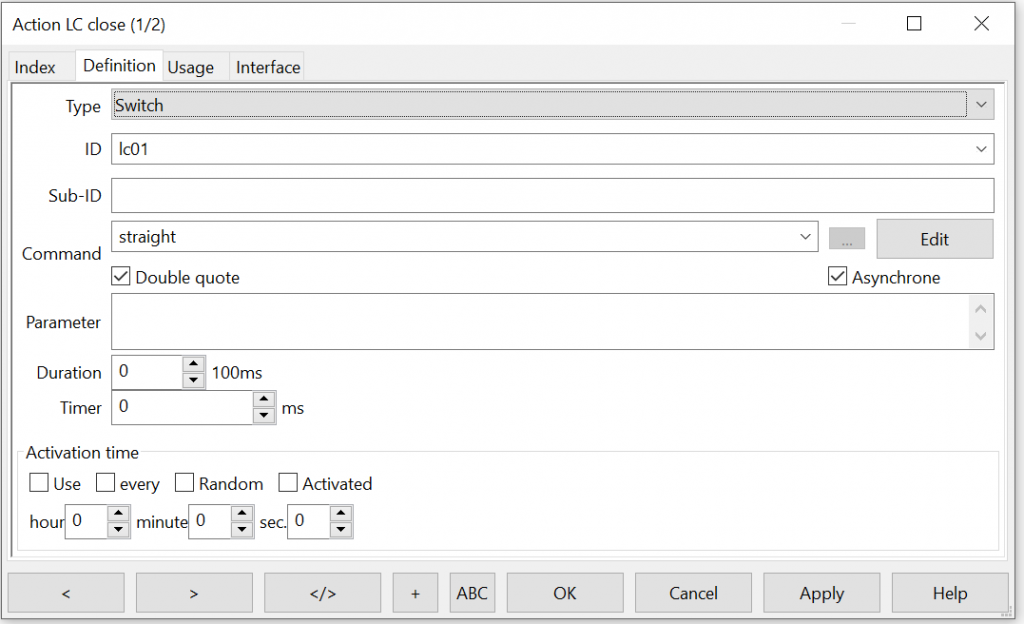
Create the first action, rename it to “LC close” and define the details of the action on the “Definition” tab by setting the switch “lc01” to “straight”.
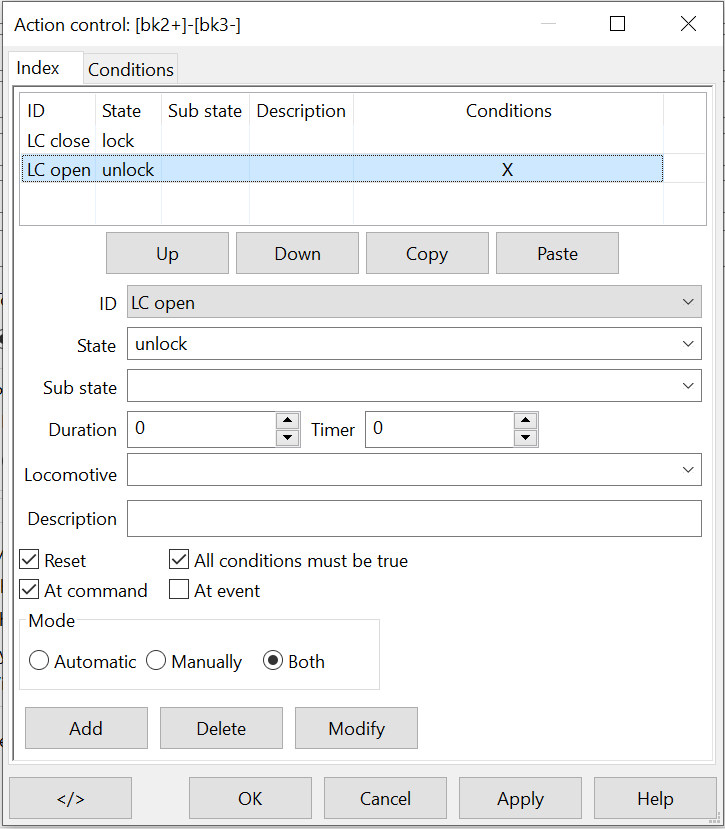
Repeat this procedure to define the second action called “LC open”. The only difference is the name of the action and the desired setting of lc01 (“turnover” instead of “straight”).
Remark: lc02 will be synchronously set whenver lc01 is flipped, as the interface addresses of the two level crossings match. That’s why separates actions for lc02 are not required.
The result should look like this:
5. Now let’s configure the triggers for our actions. We do this by adding “actions” to our routes that lead over the level crossing. This way, our actions become “route actions”.
Enter the route dialog “Track plan / Routes”. Find route [bk2+]-[bk3-] and select it. Navigate to tab “General”.
On this tab, you will find a button called “Actions”, and a checkbox called “Automatic generated”:
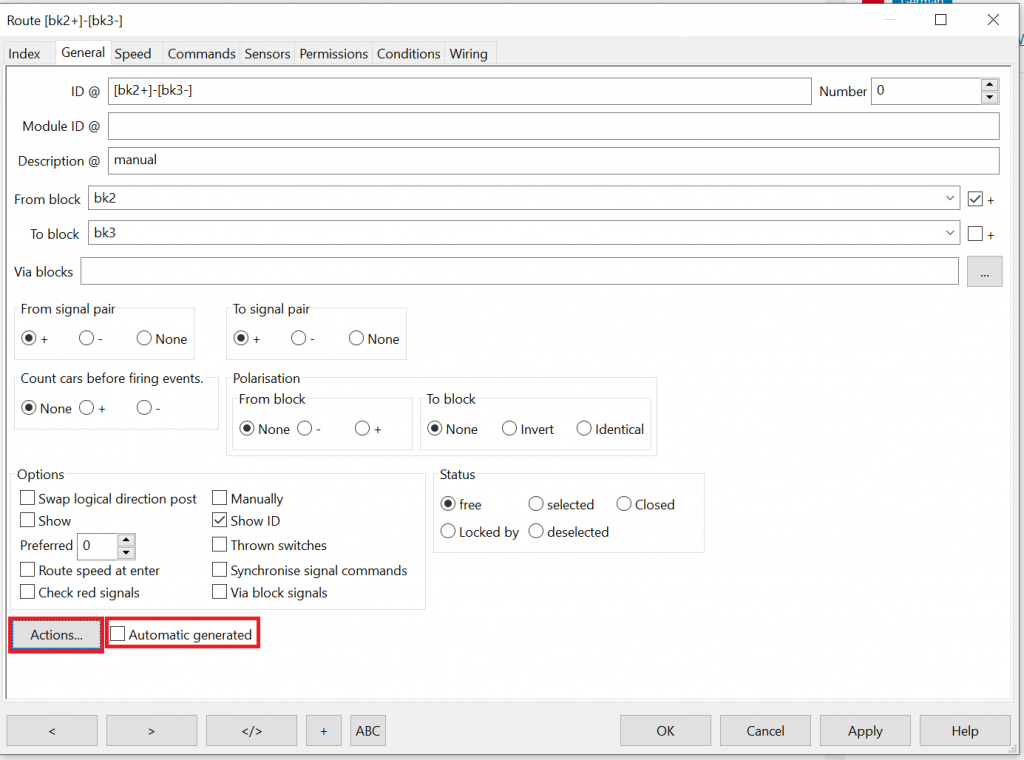
Before you hit the Actions button, I recommend to disable the “Automatic generated” checkbox and hit the “Apply” button. The effect is, that the auto router will then no longer mess around with this route but consider it “static”. So if you change your track plan later, and let the auto router calculate the new routes, all of the changes and settings that you are about to do in the “Actions” menu will be preserved. If you do not disable the checkbox, your changes will be lost if you run the auto router. It took me some time to find that out, and it has contributed to the amount of gray hair on my head significantly.
Now we are ready to hit the “Actions” button and enter the Actions dialog.
Here is the basic idea:
- When the route is locked, the “LC close” action is executed and the boom barriers close.
- When the route is unlocked, we check if another route leading over the level crossing is locked; if no, action “LC open” is executed and the boom barriers open; if yes, nothing happens.
The first route action “LC close” should look like this:
The second route action “LC open” should look like this:
Please note that the flag “All conditions must be true” should be set if you need to list more than one route on the “conditions” section (see just below).
The “conditions” for this route action must look like this:
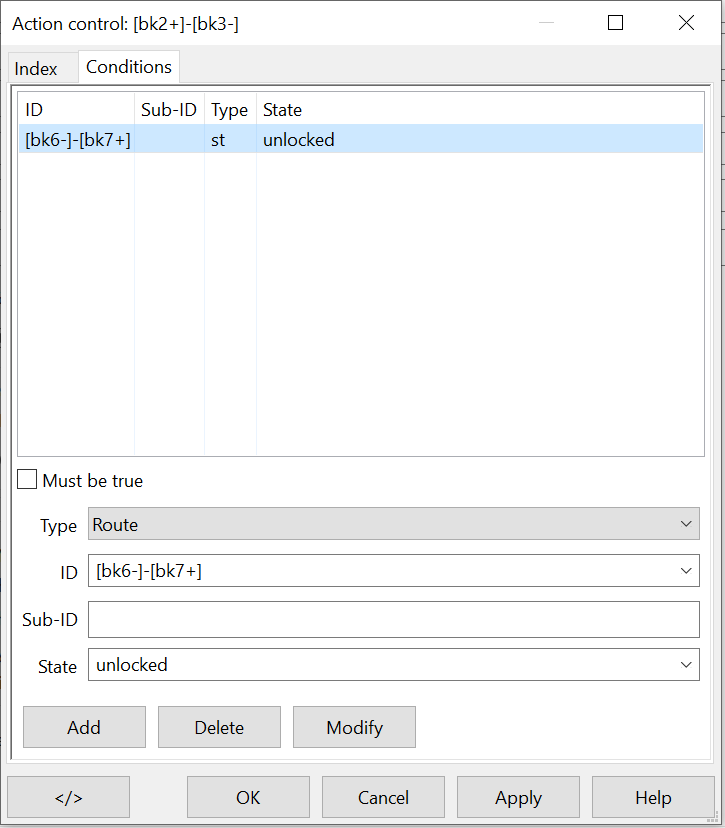
The idea is that the action “LC open” is executed only if the other route that leads over the level crossing is not locked. If this is the case, a train is still on or near the level crossing and the boom barriers must stay closed.
6. Congratulations! You have just set up your first automatic double track level crossing. Test the level crossing by letting one, then two concurrently running trains go in automatic over the level crossing. The boom barriers should now close when a train is approaching and open when all trains have left the level crossing.
If you have understood the basic concepts described in this example, you will be able to also setup level crossings with three tracks or more.
Puh, time for a break. Grab a coffee before you continue to read, because now it gets even more complicated.
Example 4: Double track level crossing using sensors, variables and actions
In the last example we have mastered the setup of a double track level crossing using routes and route actions. This is very often a useful approach, and leads to robust results. Nevertheless, all level crossing operations are strictly bound to locking and unlocking routes in this scenario.
There are situations, in which this limitations this is not desired. Imagine you have a block just ahead of a level crossing. If a train waits in that block and then sets off to go over the level crossing, the boom barriers might not have sufficient time to close. Another example is a different treatment of fast and slow trains on your layout – when a fast trains approaches, you may need to close the boom barriers before you allocate the route over the level crossing.
So, what’s the solution? In this example, we will use our self-defined “actions” from the last example again, but we will trigger them not from routes, but from sensors instead. This way, our actions become “sensor actions”.
And we will extend our use of advanced Rocrail features again by using “variables“. A variable in Rocrail may contain a textual or numerical value. And can be used in various action triggers to decide if an action should be executed or not. We will use that for “locking tracks” that lead over our level crossing.
Follow these steps to add a double track level crossing to your Rocrail layout and automate it using sensor actions and variables:
1. Add level crossings to a double track on your Rocrail track plan. The level crossing can be found in “Accessories” in the “Add item” window when editing the track plan. Name them “lc01” and “lc02”. Make sure the two level crossings have the same interface address. This is required to let the boom barriers move synchronously whenever one of them is flipped. Connect it to your tracks. Make sure that the routes leading over your tracks are one-way tracks.
Example:
2. Let the router create routes for you (generally recommended) or do this yourself (only recommended in special cases). In the example above, the router would create several routes like this. The marked routes lead over the level crossing:
3. Edit the properties of the level crossing objects on the track plan. On the “general” tab, delete anything in the fields “Block ID” and “Route IDs”:
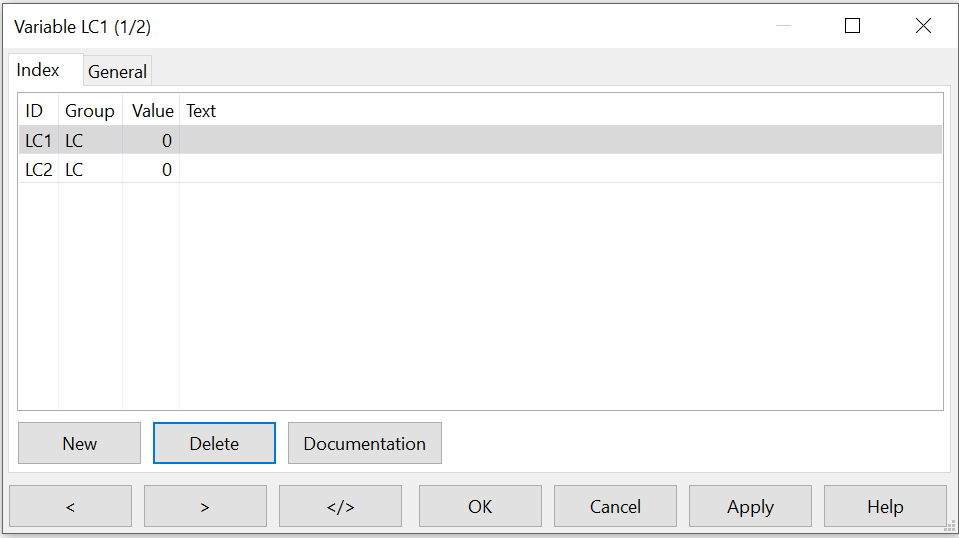
4. Define the status variables for the closing state of the level crossings. Choose menu “Tables / Variables” and create two variables. The result should look like this:
5. Time to create our actions (menu “Tables / Actions”). This time, we need six actions. The first two are for opening and closing the boom barriers, the four last are for locking and unlocking the two boom barriers (i.e. if a train is on the specific track).
Define the first two actions to flip lc01 to straight and turnover respectively. lc02 is synchronously flipped whenver lc01 is triggered, as the interface addresses of the two level crossings match.
The four subsequent lock and unlock actions must set the variables LC1 and LC2 to 1 (locked) and 0 (unlocked) respectively.
The result should look like this:
6. Now we need to setup the sensor actions. We do this by attaching the actions to feedback sensors on the layout. Select the sensor, enter the properties dialog, navigate to the “General” tab and choose “Actions”.
The idea is as follows:
- When a train hits a specific feedback sensor ahead of a level crossing, two actions are executed: 1. close the boom barriers (LC close), 2. lock the level crossing (LC1 or LC2 lock).
- When a train hits a specific feedback sensor behind a level crossing, two actions are executed: 1. unlock the level crossing (LC1 or LC2 unlock), 2. open the boom barriers (LC open), IF THE OTHER LEVEL CROSSING IS NOT LOCKED.
This means, that the “LC open” action needs to have the following condition:
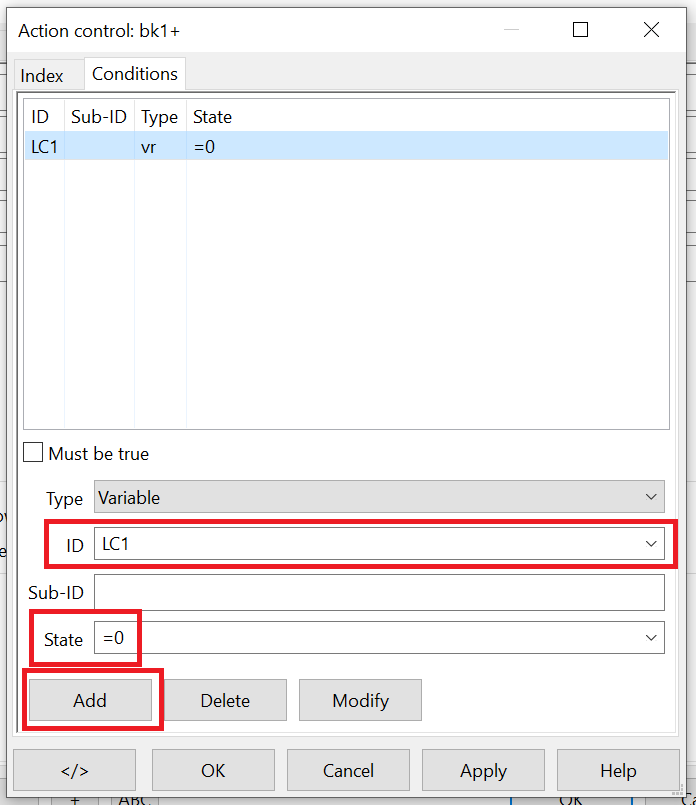
All other actions are unconditional. Add them accordingly to the sensors that shall trigger the closing and opening of the level crossing.
7. Test the level crossing by letting one, then two concurrently running trains go in automatic over the level crossing. The boom barriers will now close and open automatically.
If you have understood the concepts that were applied in this example, you will be able to figure out how to setup even more complex scenarios yourself.
Good luck!
Virtual Sensors
Virtual Sensors send “open” and “closed” events to Rocrail when the boom barriers are fully closed or opened. With this feature, you can prevent that a train is passing the level crossing before the boom barriers have fully closed.
To use this wonderful feature, we need to activate a Rocrail feature called “switch feedback”. Switch feedback is mechanism that allows if an appliance on the layout has actually reached its desired status after it has received a command. Switch feedback is available for most components that are logically handled as switches in Rocrail, e.g. switches themselves, level crossings and bascule bridges!
Navigate to the Rocrail properties, choose tab “Automatic”, and activate the option “Enable switch feedback” in the “Switch” box:
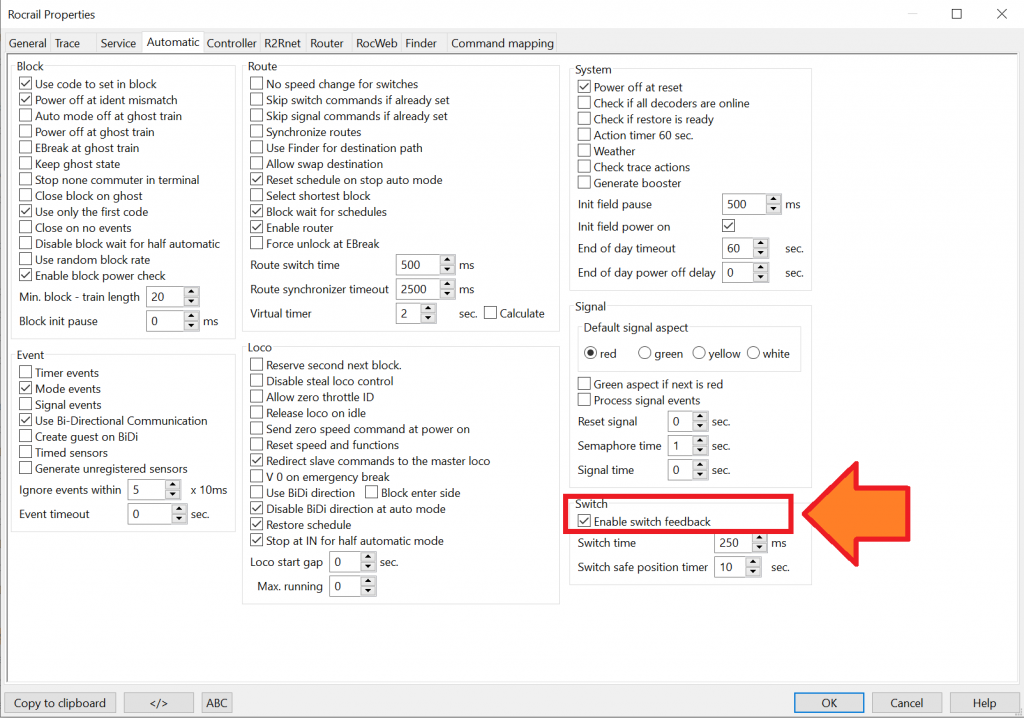
Please note that you need to restart Rocrail before the setting is effective.
After that, you need to create to two sensors on your layout. Do not connect the sensors to your track system. Instead, place that somewhere else on the screen. Call these sensors “fb-booms-open” and “fb-booms-closed”. The Node Id of the sensors must be the MattzoControllerId, the Address must be the number in the sensor array in the MattzoController configuration (first sensor is number 1, not 0).
Attach these sensors to the level crossing object in the “Wiring tab” by selecting them in the dropdown fields (on the image, the sensors are called fb-bridge-open-fully and fb-bridge-closed-fully):
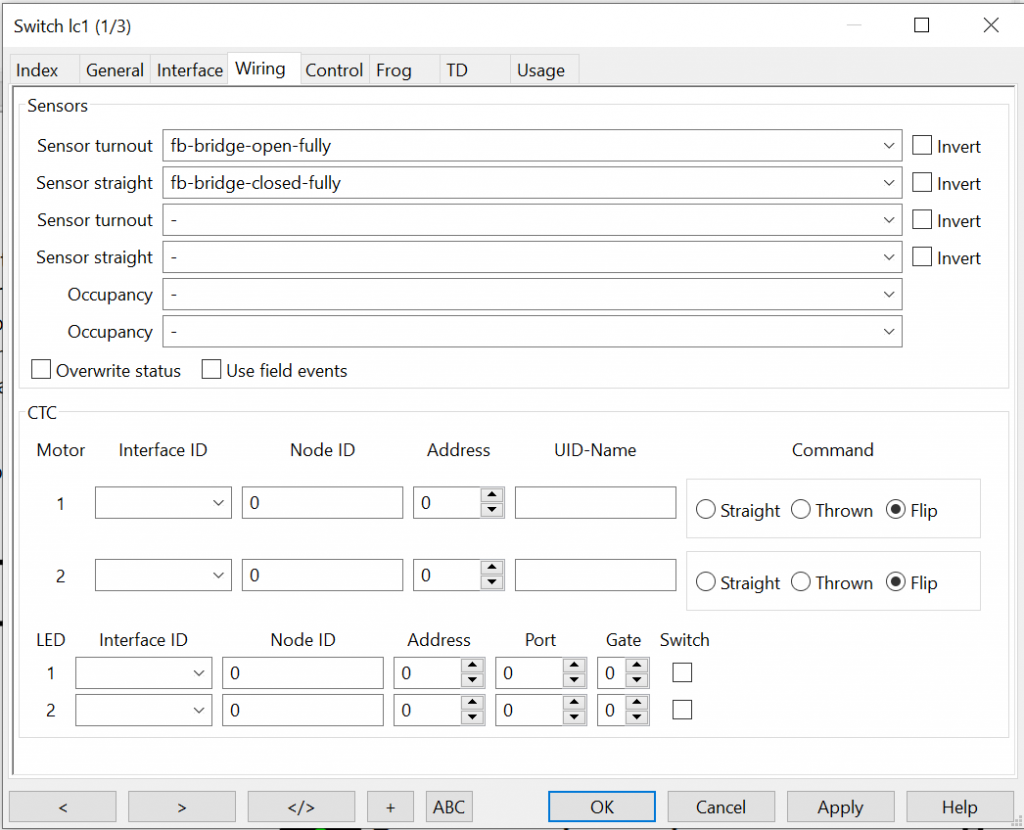
In the MattzoController configuration, the type of the sensors must be “VIRTUAL_SENSOR_PIN_TYPE”, and they must be mapped in the properties “sensorIndexBoomsClosed” and “sensorIndexBoomsOpened” fields in the level crossing configuration.
Finally, it is handy to create a text field next to the sensors in Rocrail, which makes it easier to remember for which purpose you created the sensors.
The following example show a small layout with two virtual sensors:
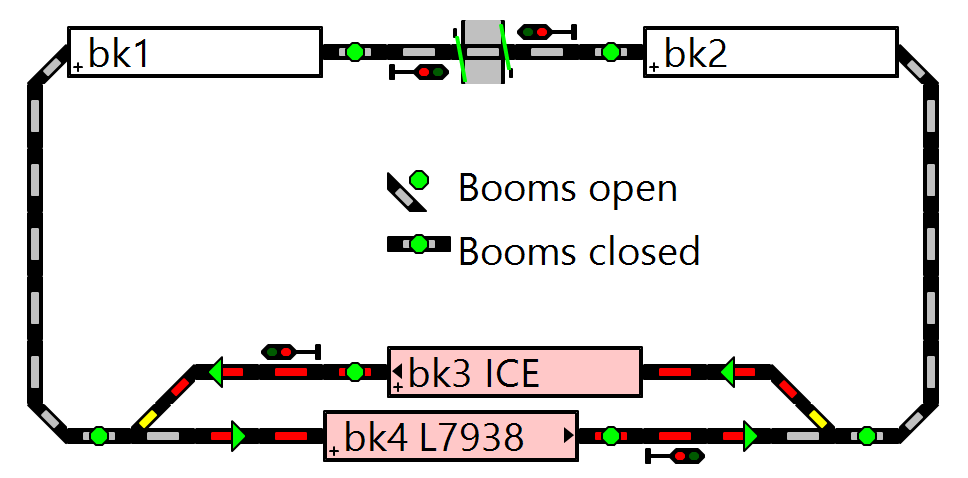
When the boom barriers are opened and closed, the level crossing will appear red until the booms are reported to have reached their final position. The effect in auto mode is, that Rocrail will not clear trains over the level crossing until the booms are fully closed.
Wheel Counters
When operating in Rocrail mode, you can use a feature called “wheel counter” to open the boom barriers right after the last car has passed the level crossing. The idea is, as in autonomous mode, to count wheel axles.
Prequisite
Make sure that the loco and the last waggons both have magnets! If the train is longer than the shortest distance between two sensors, add some extra magnets in the middle waggons.
Setup in Rocrail
Let’s assume you have setup the layout below. The level crossing is between block bk1 and bk2.
To use wheel counters, you need to enter the properties dialog of the feedback sensors for block bk1 and bk2. Navigate to the “Interface” tab and select “Wheel counter” instead of “Sensor”. You need to do this for all four sensors of the mentioned blocks.
Now right click on block bk1, select “Properties” and navigate to the “General” tab. Select “Free previous block on enter” and check the “-” and “Route” box. This frees the route from route bk2 to bk1 after having triggered the minus sensor of bk1 as many times as the preceeding plus sensor in block bk2 was triggered.
Repeat the procedure for block bk2. Choose “+”´instead of “-“.
Last thing you need to do is to enable the setting “Free previous block on enter” for your locomotives. This is done by entering the properties dialog of the loco, choose tab “Details” and enable the appropriate setting.
Here you go. You have successfully setup wheel counters for level crossings.
Side note: the same procedures works for standard block sequencing without level crossings as well and can significantly speed up your train operations on the whole layout.
Wiring Diagrams
Wiring Diagram for Rocrail Mode
The following diagram shows the wiring for the MattzoLevelCrossingController in Rocrail Mode. The corresponding example file for the MattzoLayoutControllerFirmware is called “MattzoLayoutController_Configuration_LevelCrossing.h”.
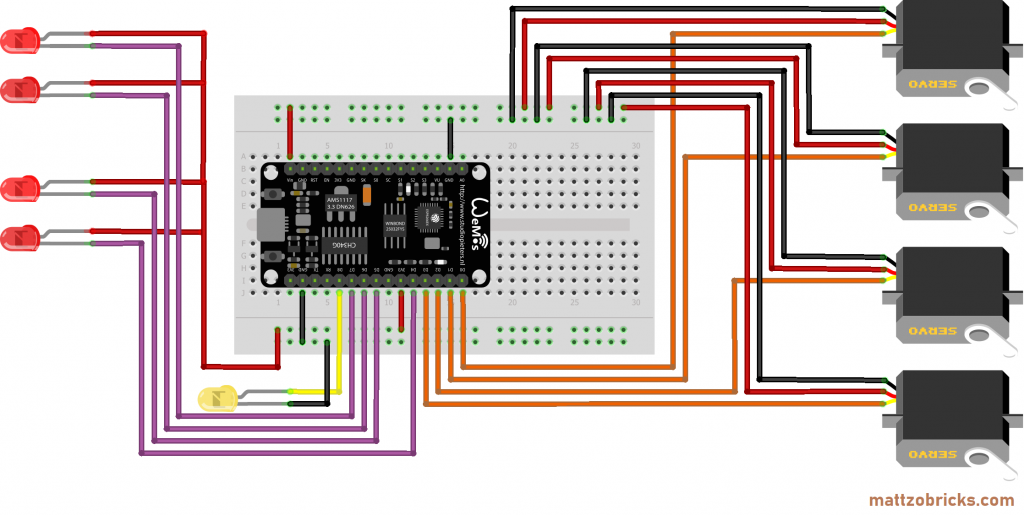
The setup uses four ports for boom barrier servos (2 primary and 2 secondary booms), and four ports for the level crossing lights. If more lights are attached, can can evenly connect them in parallel to the existing ones.
Pin D8 is used for a status LED.
Required components:
- Servo motors for boom barriers. We have successfully tested and recommend the boom barriers from TrixBrix.
- Level Crossing Lights. We have successfully tested and recommend the boom barrier lights from TrixBrix. Other LEDs will also work. In this case, you might need some additional resistors wired in series.
- I/O board with micro controller. We have used a NodeMCU Amica Modul V2 ESP8266 ESP-12F. Similar modules should work as well.
- An LED (if status LED is installed). Make sure that the LED cope with the power supply. Depending on the type of LED, they each might need one additional resistor wired in series.
- Basic stuff like bread board, wires etc.
Wiring Diagram for Autonomous Mode
The next diagram shows the MattzoLevelCrossingController in Autonomous Mode. The corresponding example file is called “MattzoLayoutController_Configuration_LevelCrossing_PCA9685.h”.
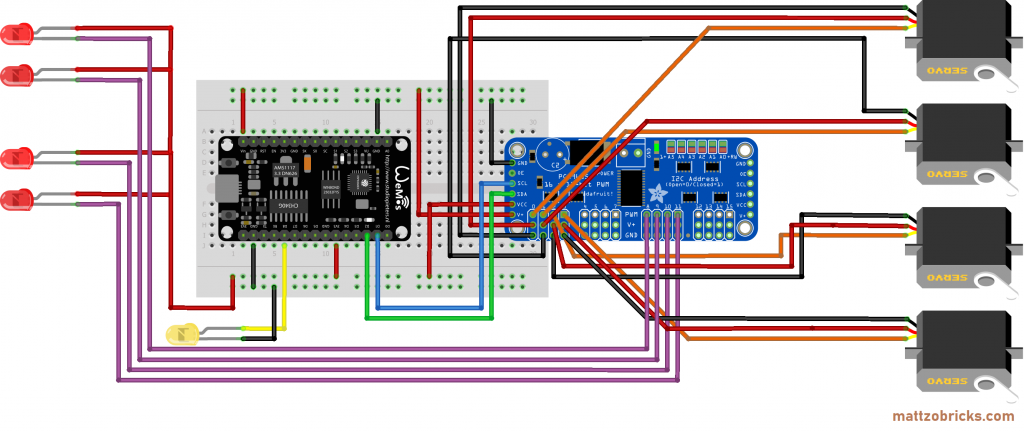
The setup uses again four ports for boom barrier servos (2 primary and 2 secondary booms), and four ports for the level crossing lights. If more lights are attached, can can evenly connect them in parallel to the existing ones. The difference to the diagram before is, that a port extender PCA9685 is used to provide additional ports for sensors.
The local sensors are attached to pins D4 to D7 (not displayed in the wiring diagram). Please note that in the example file four additional remote sensors are declared as inbound sensors. So if you take it precisely, the configuration is rather for the “Hybrid Mode” than for the “Autonomous Mode”.
Pin D8 is used for a status LED.
Required components (in addition to the wiring diagram for Rocrail Mode):
- A PCA 9685 port extender.
Hi, you have said reading the board in the wiring diagram:
“We have used a NodeMCU Amica Modul V2 ESP8266 ESP-12F.”. but I don’t think that is correct?
The NodeMCU Amica Modul V2 ESP8266 ESP-12F is what you have used for the MattzoLayoutController?
Thanks , John
The exact type does not play a role. Any ESP8266 should be fine, actually.