
The Uerdinger Schienenbus VT 95 / VT 98 is a part of German railroad history. There is hardly any decent model train layout in Germany without this vehicle.

Media
Check out this video about the railbus VT98 for the LEGO train system:
German version:
What sets are available?
To my knowledge, there are presently two rail busses available from 3rd party vendor BRIX for the LEGO train system. The first (no. 101297) is build as a 6-wide vehicle, the second one (no. 105232) is 8 studs wide.
The 6-wide version
The 6-wide consists of a powered unit (Triebwagen) and a non-powered car (Beiwagen / Steuerwagen). The cars are connected with a long technic liftarm.

The front of the bus doesn’t look like the original Uerdinger Schienenbus, mainly because the main lights are located too close together.

The construction is shaky and parts fall off when you just touch it slightly.
It feels like the designer has constructed this train with studio.io only, without ever having it build in reality – especially not with low quality bricks from China.
Without a substantial amount of plastic glue, the vehicle can not be operated on LEGO tracks for more than a couple of curves until it disintegrates. Even if you glue the parts together, it won’t hold as it should.

The liftarm that ties the units together is mounted far too low, so the vehicles are not able to pass switches. This means, that you can only operate the powered unit without the non-powered car, or your layout must not have any switches.

A standard Power Functions battery box or Powered Up unit does not fit in. You can put a Powered Up unit without the bottom inside, though.

The train is powered with a standard LEGO or compatible train motor.

With that standard train motor, the vehicle is a bit too fast to make a realistic impression on the layout.
The installation of sensor magnets is quite simple, which is also probably the only advantage over the 8-wide version that I could find at all:

In summary, the set is bad, really bad. It is not even worth buying as a still model for your show case.
We do not recommend to buy it.
But, as almost anything, it can be integrated into the Mattzobrick Train Automation System, which I did. Also ugly childs have a place on my layouts.

The 8-wide version
After the disappointing 6-wide railbus version, I had decided not to buy anything from BRIX / Bluebrixx ever again. Not in a lifetime.
But then somehow the 8-wide version of the railbus sneaked into my shopping basket and there it was. What a luck, because so I discovered this rare and wonderful marvel in the brick world.
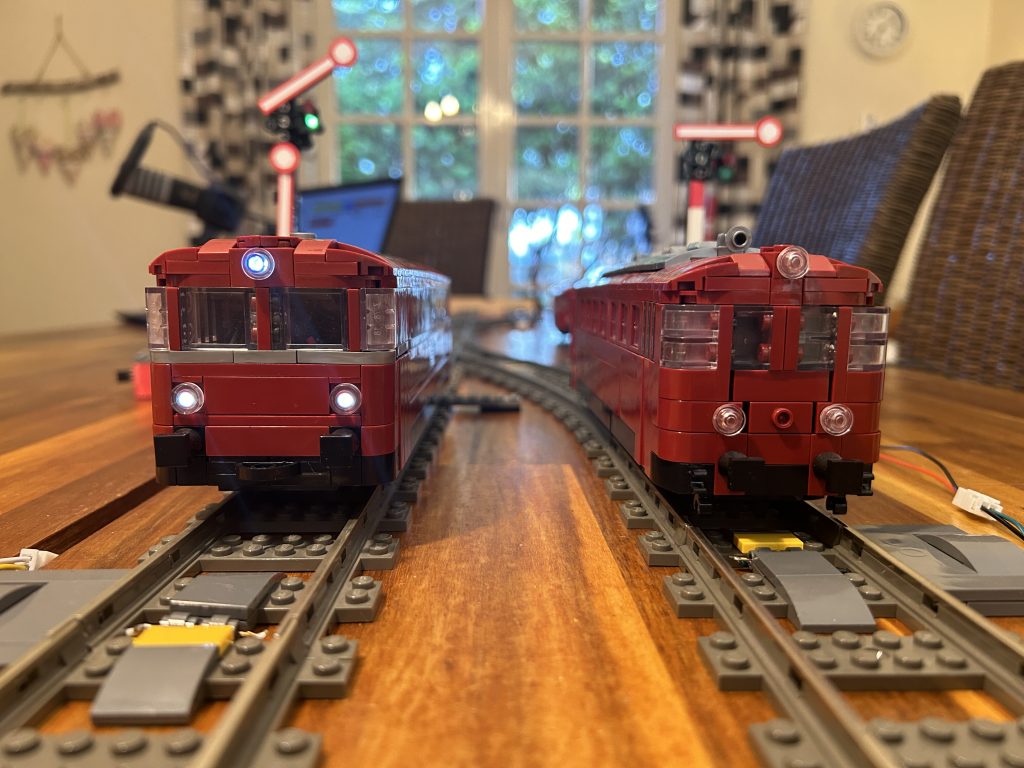
The 8-wide version consist of a single VT98 powered unit (Triebwagen). It does look significantly better than the 6-wide version.

The 8wide version is also way more fun to build than the 6wide version. The part quality is really good, and the construction is stable.

The railbus can be powered with a simple LEGO Power Functions Motor. The drivetrain can be built in two different ways, which determine the speed of the train. There is a reducted version that makes the train slow, which leads to a very realistic movement over the layout. The higher gear makes the train faster.

If the noise of the drivetrain annoys you, throw out all moving Chinese parts and replace them with genuine LEGO parts – that helps a lot!
There is also one slight modification that I did to make the side window rows more stable.

I was clear from the beginning that I had to integrate the 8-wide railbus into the Mattzobricks Train Automation System. In addition, I wanted to install automatic bi-directional lights into the railbus, with three white front lights, and two red rear lights as in reality.


One advantage of the 8-wide version is that there is more space inside for automation components like a MattzoController, LEDs and the battery box. But, still, the space is quite limited, so you need to use each cubic-stud very carefully.
It took me some time to find a viable solution to cope with all the pretty advanced lighting features I had in mind.
The solution I finally found consists of the following parts:
- 9V battery box, part no. 4760c01
- MTC4PF (MattzoController for Power Functions)
- 2 white 3mm LEDs for the top lights
- 4 bi-color LEDs (white / red) for the main lights

This is the wiring diagram for the bi-directional lights.
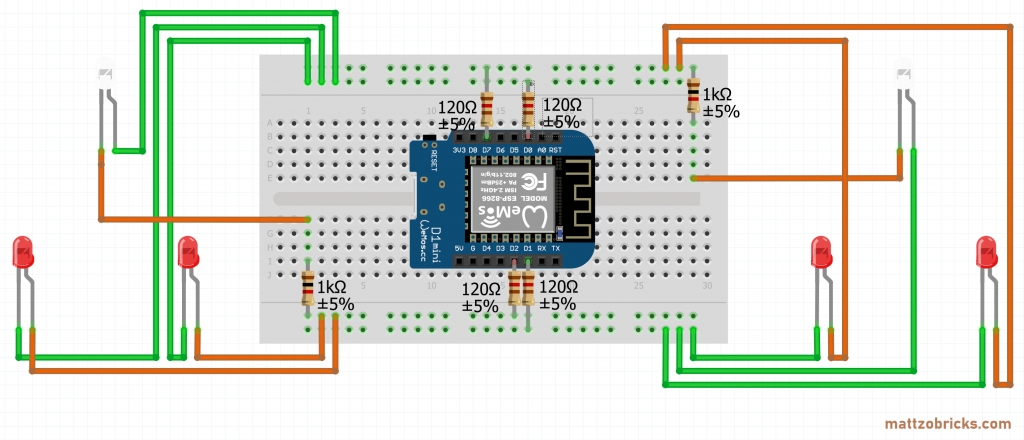
The pin pair D0/D2 is used for the front lights, D7/D1 for the rear lights. Even if you know what you are doing, it is advisable to build this circuit on a breadboard first before wiring it into your train.
There is an example configuration on the MTC4PF firmware package for the 8-wide railbus (MTC4PF_conf_BUS-8W.h).
The battery box and the MTC4PF are stacked, so that they fit exactly into the train.

As the top plate of the MTC4PF is 2 plates higher than the bottom of the roof, the roof needed some slight modification.

The MTC4PF also needed to be modified. The two unused pins D1 and D7 were connected with some bend pins that come out on the top of the controller. The pins were required to supply enough current for all of the LEDs.

Integrating the LEDs into the railbus needed some tinkering. Fortunately, the designer might have even thought about the lights, and has – coincidentially or not – left some space for wires etc. in certain areas of the vehicle – a nice surprise.

The lights are wired together with small wiring boards that fits nicely into the front and aft compartment.

The integration of the magnets looks a bit tricky without modification of the base structure of the vehicle. After some tinkering, I just put the magnets into LEGO part no. 2817 (plate, modified 2 x 2 with pin holes), and attached the parts below the body of the vehicle – sometimes the solution is simplier than you think in the first place.

The result is a really beautiful and nicely lighted train that moves nicely and slowly over your layout. It is one of my favourite trains.
In summary, I can recommend to 8w version of the railbus, especially if you intend to automate it with the Mattzobricks Train Automation System.